
Today, I will be writing on How to create Active Directory Users with Powershell. If you want to know how to create an Active Directory domain and promote a Windows Server to a domain controller, head over here.
Alright, so we have a active directory domain and a domain controller which will authenticate users in the domain. But we do not have any users. There are two ways to create users in an Active Directory domain.
One is from the Active Directory Users and Computers from the Administrative Tools on the Windows Server. And the other way, I mean the easy way is creating users from Powershell.
This is going to very interesting post as I will telling you different ways of creating users within Powershell. First things first, you need to make sure that you have Powershell installed on your machine. And also try and have Powershell 3.0, because it has some cool features from its predecessors. You can download Powershell 3.0 from here.
Once done, verify the version of Powershell opening up a Powershell window from start menu. Make sure you open the window by right-clicking and Run as Administrator. If you don't, then trust me friends, BAD things happen!
$PSVersionTable
You should see something similar to the below image.

Now that we have taken care of the prerequisites, lets get to the meat of the article.
The cmdlet that helps you with creating a new user in an Active Directory domain is New-ADUser. I am sure that was difficult to guess. No it wasn't!!
Trust me guys, the Powershell team has made it extremely easy for us to understand and use this cmdlets. They follow the Verb-Noun naming convention.
I always recommend that once you hear or know a new cmdlet, get the help files related to it and spend some time understanding it! The way you get the help is by simply typing the below:
Get-Help New-ADUser
You can also add different parameters at the end to get different forms of help file. Simply append -Examples to the above line and see what happens.
Voila! It gives a complete info along with a few examples as to how you can use that cmdlet.
Now lets go ahead and add a real user!
New-ADUser Ronnie
Assume that you want to see the user that you just created now. Do not worry my friends, it could not have got any simpler, just type the below:
Get-ADUser Ronnie
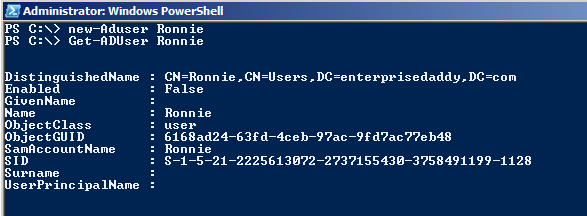
Powershell will show everything that it has related to Ronnie. By default it shows only a few properties related to the user.
Let us say that you want to see all the properties associated with the user.
Get-ADUser Ronnie -Property *
The user Ronnie does not have many properties associated with him. You can see that there are lot of places that are left blank. That is because when we create Ronnie, we just gave his First Name.
Let us add his Last Name and give him a description so that you can easily find anything you want about Ronnie in future.
For this we will be using the Set-ADUser cmdlet. But you can also use Set-ADObject if you like to.
Again, I highly recommend that you go through the help files for each cmdlet that I have introduces in this post.
Get-ADuser Ronnie | Set-ADuser -Description "Ronnie is from the Marketing Team" -SurName "Hopkins"
This was fun until you have couple of users to add. Imagine you get a list from someone saying that you have add 200 users today! I am sure that is going to be a pain.
Most often people will give the list of users with a csv file. Powershell lets you play with the csv files easily and make changes as per your wish. Assume that I have a csv file named newusers.csv
Make sure the first row of the csv file contains only the properties that are associated with the New-ADUser cmdlet.
#View users from CSV
Import-CSV ".\users.csv" | Out-GridView
Out-Grid View is just going to show the list on my screen in a nice format!
# Import users from CSV
Import-CSV ".\newusers.csv" | New-ADUser
We just imported the users and added them to the domain.
Before we continue, let us create a new Organizational Unit at the root of the domain.
New-ADOrganizationalUnit NewUsers
# Import users from CSV, set password, enable
Import-CSV ".\newusers.csv" |

 New-ADUser `

-Enabled $True `

-AccountPassword $(ConvertTo-SecureString "P@55word" -AsPlainText -Force) `

-Company 'Enterprise Daddy.' `

-Path 'OU=NewUsers,DC=enterprisedaddy,DC=com'
In the above example we started to add the properties to the User accounts on the fly, the properties that were not mentioned in the csv file. Powershell gives you that flexibility and complete control.
Also note the character ` which you will find below the Esc key, this helps you make your code look clean and continue to the next line. Powershell will consider as though the code is continuing and is in the same line.
That was a lot of information at once, but once you get used to the cmdlets, administration through Powershell is going to make your life so easy that you will cry out with happiness!!;)
So that is all I have for you guys in today's post. If you do face any problems while trying the cmdlets that were introduced above, please write in the comments and I will try my best to answer all the doubts.
I hope that this was informative and thank you for reading!


