Like I said earlier, I will building my lab soon and I was setting up few important things before I could start the actual labs. So today I have decided to write on enabling Powershell remoting on all the machines in the environment.
You will be able to do so in your environments as well.
Powershell really is a game changer if you're constantly dealing with Microsoft related products, as it is one of the core components which makes management and scripting on Windows a real easy task. One of the important features of Powershell is in its ability to remotely execute scripts on other machines.
Powershell remoting lets you connect to a remote system and run commands locally, then returns the results to the calling machine. This can be done as an automated block or as an interactive session.
Remoting requires Powershell 2.0 which comes default with Windows 7 and Windows Server 2008 R2, other operating systems you have to install separately. The WinRM service will also have to be configured and enabled.
Today I will be showing to enable remoting via group policy.
All of the settings that we will be using in the Group Policy Editor will be of Computer Configuration node.
1. Create a GPO, name it as you want and link to whichever OU to like.
2. Edit the policy.
Enabling WinRM
- Browse to:
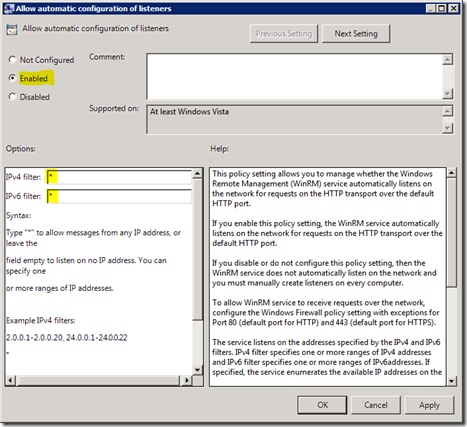
Policies > Administrative Templates > Windows Components > Windows Remote Management (WinRM) > WinRM Service- Open the “Allow Remote Server management through WinRM” policy setting (Server 2008 R2 and later).
- Open the “Allow automatic configuration of listeners” policy setting (Server 2008 and earlier).
- Set the Policy to Enabled.
- Set the IPv4 and IPv6 filters to * unless you need something specific there (check out the help on the right).
In addition to this, you will have to enable WinRM service to start automatically on the client machines.
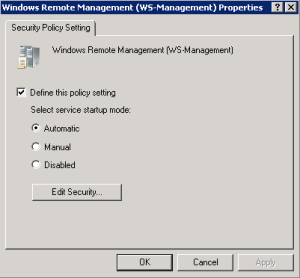
To configure the WinRM service to start automatically, navigate to Computer Configuration Policies > Windows Settings > Security Settings > System Services > Windows Remote Management,
Doubleclick on Windows Remote Management and configure the service startup mode to “Automatic”:
Setting the Firewall Rules
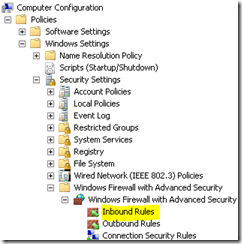
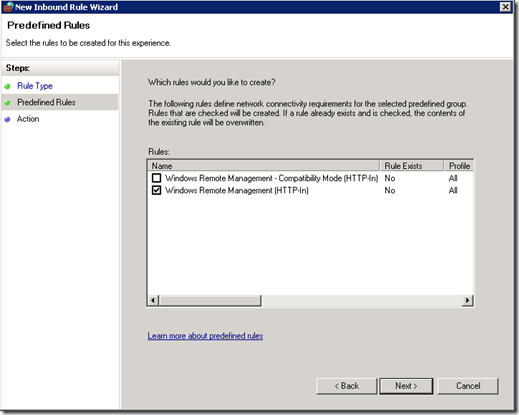
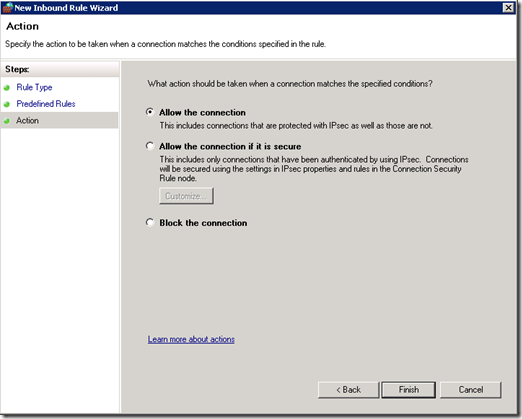
You need to create a new Inbound Rule under Computer Configuration > Policies > Windows Settings > Windows Firewall with Advanced Security > Windows Firewall with Advanced Security > Inbound Rules:
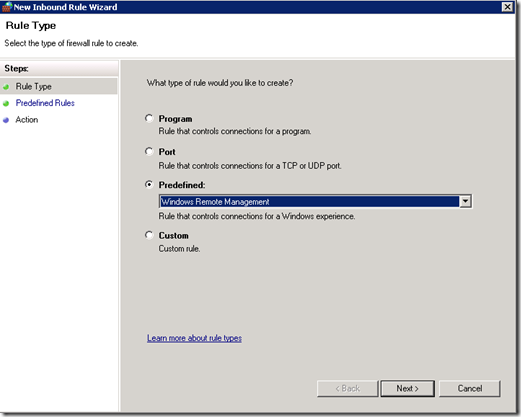
The WinRM port numbers are predefined as “Windows Remote Management”:
With WinRM 2.0, the default http listener port changed from TCP 80 to TCP 5985. The old port number are a part of the predefined scope for compatibility reasons, and may be excluded if you don`t have any legacy WinRM 1.1 listeners.
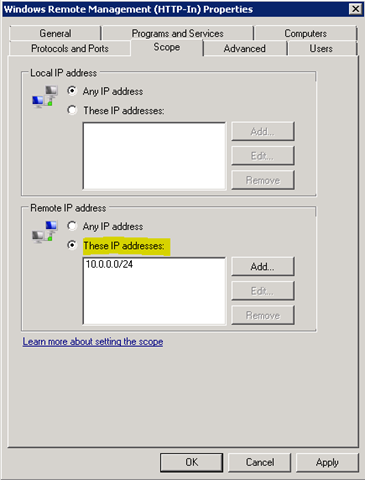
When the rule is created, you may choose to make further restrictions, i.e. to only allow the IP addresses of your management subnet, or perhaps some specific user groups:
Note that this is the minimal configuration that we have done, there is a lot more you can do with the settings, but that is something beyond the scope of this article. Feel free to explore the policy settings.
Wrapping up!
This is all you need to enable remoting via group policy. Now go ahead and apply the policy to the appropriate OUs and start testing. I usually like to remove Authenticated Users from the security filtering and test on different machines before I roll out the policy to production environment.
Happy remoting!



5 Comments
Good stuff. Email subscription to you blog would be nice. Thanks for sharing.
Thank you for your kind words. Yes that is something I am working on! Keep visiting for more updates until then 🙂
Hello Adil Arif,
Great for providing informative topics.
Have u come across mapped share drives disconnecting after restart in Windows 7 and info regarding this.
i will be great full.
Regards,
Mohan
Nice write up. What does your LAB look like?
Thanks Robert.
I currently have a Dell Optiplex 9020 Desktop running Intel i5 4th generation with 12Gigs of RAM.