
Welcome back, folks!
Continuing with our journey in the Microsoft Windows Server 2012 R2 70-410 Exam- Installing and Configuring series, we will now be moving on to the fourth chapter where we will be covering three more objectives.
Today, we will be dealing with the Exam 70-410 Objective 4.1 - Configure IPv4 and IPv6 addressing.
This objective deals with the basics of the networking concepts in the Windows Server 2012 R2 and makes you aware of the things that are possible to do while using the Server OS.
This objective covers how to:
- Configure IP Address Options.
- Configure IPv4 and IPv6 addressing.
- Configure Subnetting and Supernetting.
- Configure interoperability between IPv4 and IPv6.
- Configure IntraSite automatic Tunnel Addressing Protocol (ISATAP)
- Configure Teredo.
Configure IP Address Options
IPV4 Address space consists of 32-bit addresses notated as four 8-bit decimal values from 0 to 255 and separated by periods.
Each address consists of network bits, which identify the network and host bits, which identifies the particular device on that network.
To differentiate the network bits from the host bits, each address must have a subnet mask.
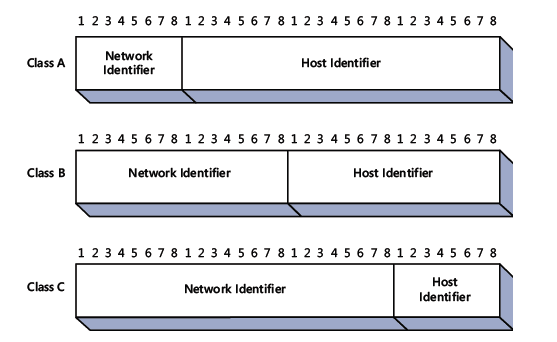
IPv4 Classful Addressing
The original standard defines three classes of IP Addresses, which support networks of different sizes.
To understand them better, let us analyze it in the form of a table.
| IP Address Class | Class A | Class B | Class C |
| First bit values | 0 | 10 | 110 |
| First bit values (Decimal) | 1 - 127 | 128 - 191 | 192 - 223 |
| Number of network bit identifier | 8 | 16 | 24 |
| Number of host bits identifier | 24 | 16 | 8 |
| Number of possible networks | 126 | 16384 | 2097152 |
| No of possible hosts | 16777214 | 65534 | 254 |
Below figure shows what is explained in the table above.
Configure IPv4 and IPv6 Addressing
To check the IPv4 address associated with the Windows Server graphically, follow the below steps.
Open Network and Sharing > Select the Network Adapter > Select IPv4 Address Properties.
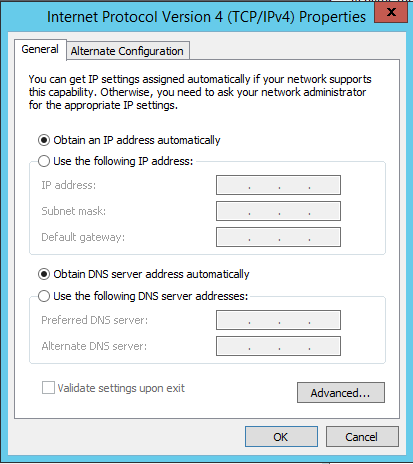
Currently, this machine is receiving its IP Address from a DHCP which we will discuss a lot more in the upcoming articles.
Now let us see how to find the same details on the server core as it does not contain any GUI.
Configuring IP Addressing on Server Core can be quite intimidating at first. So we have a pseudo way of doing this for beginners.
We definitely have Powershell commands which we will be dealing with the upcoming section. For now you can use a utility called sconfig.
To know more, read the following article.
Configure Server Core IP Addressing using sconfig
IP Address Options using PowerShell
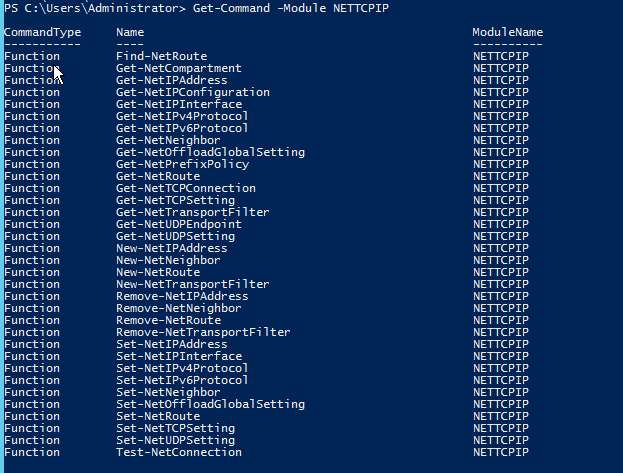
Get-Help is a great tool to explore Powershell cmdlets. The module that we are interested in currently is NETTCPIP.
Get-Command -Module NETTCPIP
This will list all the cmdlets that are part of this module.
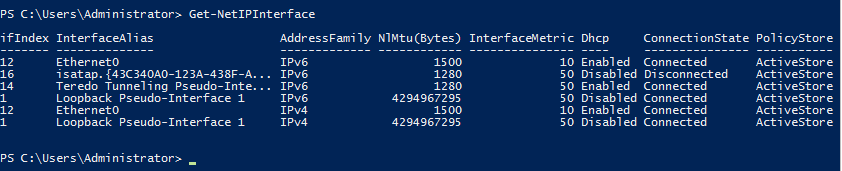
This cmdlet provides you details regarding all the network adapters that are currently associated with the machine. It includes both the IPv4 and IPv6 addressing.
If you are interested only in the IPv4 addressing, then you need to specify the AddressFamily parameter.
Get-NetIPAddress -Addressfamily IPv4
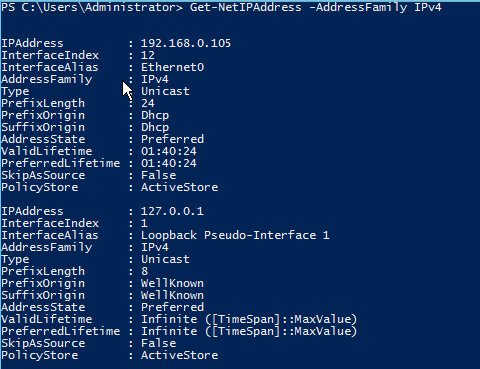
The above cmdlet lists all the IP interfaces associated with the machine.
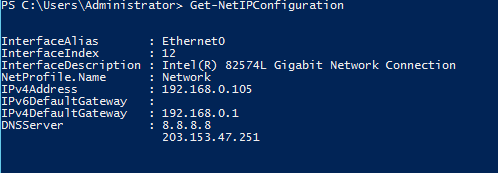
Gets you the details related to the Ip configuration on the network adapters.
Let us now say that you want to change the IP Address on one of the network adapters.
Get-NetIPAddress -InterfaceIndex 12 -Addressfamily IPv4 | New-NetIPAddress -IPAddress 192.168.0.200 -Prefixlength 24 -DefaultGateway 192.168.0.1
Configure Subnetting and Supernetting
In most cases, administrators use addresses in one of the private IP addresses to create subnets they need.
Let us take an example of a Class C IP address.
192.168.0.3/24
/24 represents the subnet mask, which us the default classful addressing for Class C IP range.
The subnet in decimal would be 255.255.255.0
Now, let us say we need 16 networks.
2^4 = 16, which means we need to borrow four bits from the host identifier.
To calculate the number of hosts, the formula would be 2 to the power of the remaining number of bits on the host identifier minus 2.
2^4 - 2 = 14 hosts/network.
Supernetting is a technique used to help reduce the size of internet routing tables.
A supernet is a combination of contiguous networks that all contain a common CIDR prefix.
Let us see with an example.
| IP Address in Decimal | IP Address in Binary |
| 172.16.43.0/24 | 10101100 00010000 00101011 00000000 |
| 172.16.44.0/24 | 10101100 00010000 00101100 00000000 |
| 172.16.45.0/24 | 10101100 00010000 00101101 00000000 |
| 172.16.46.0/24 | 10101100 00010000 00101110 00000000 |
| 172.16.47.0/24 | 10101100 00010000 00101111 00000000 |
We can see from the above table that the first 21 bits are common. Therefore, these 21 bits become the network identifier of the supernet.
The resulting answer would be 172.16.41.0/21.
This one address can replace other five in the routing table.
Configure interoperability between IPv4 and IPv6
There are various options of interoperability between the IPv4 and IPv6 addresses.
Things to know while configuring this are:
- IPv4 hosts can be upgraded independently of other hosts and devices.
- You can add IPv6 hosts without affecting other IPv4 hosts.
The options that are available are:
- Intra-Site Automatic Tunneling Addressing Protocol (ISATAP)
- 6 to 4 Addresses.
- Teredo Addresses.
Configure Intra-Site Automatic Tunneling Addressing Protocol (ISATAP)
ISATAP is a protocol that enabled connectivity between IPv6/IPv4 hosts across the intranet.
These addresses are already configured. The IP address scheme that it follows can be seen below.
First 64 bits: Link Local, Site-Local or Global Prefix.
Next 32 bits: 0000:5EFE
Next 32 bit: IPv4 address.
An example of the ISATAP Address would be FE80::5EFE:192.168.0.103
If we are doing this from the PowerShell, let us see the options available to us.

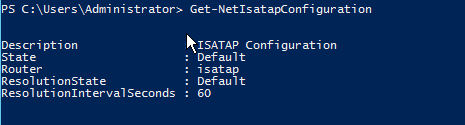
You can see above that the second IP address is the ISATAP address corresponding to Interface 16.
To get the ISATAP configuration, type below.
Configure 6 to 4 Address and Teredo
Both these options when one has to route the information over the internet.
6 to 4: This mechanism essentially incorporates IPv4 connections in a network into the Ipv6 infrastructure by defining a method for expressing the Ipv4 addresses in IPv6 format and encapsulating IPv6 traffic into Ipv4 packets.
Teredo Addresses
To use 6 to 4 addressing, both endpoints of the tunnel must have registered IPv4 addresses.
In many cases, the system that would function as an endpoint will be behind NAT router and therefore, has an unregistered address.
In such cases, the only registered address will be available to the NAT router itself, and unless the supports 6 to 4, it is impossible to establish the tunnel.
Teredo is the mechanism that addresses this shortcoming by enabling devices behind non-IPv6 NAT routers to function as tunnel endpoints.
To do this, Teredo encapsulates IPv6 packets within the transport layer UDP datagram rather than network layer IPv4 datagrams as 6 to 4 does.
Well, we have completed this particular objective and I know it was a lot to digest at one go.
I would recommend that you research a little more on the topics that we have covered to have a better understanding.
Last but not the least, I hope that this has been informative and thank you for reading! 🙂


1 Comment
Awesome article.