
Hello Folks, welcome back to the Microsoft 70-410 Guide
Our today’s topic is 70-410 Exam Objective 3.1 – Create and configure Virtual machine settings.
In the previous article, we spoke about how to configure print and document services. which you can read here.
In this next set of blog posts, Adil has asked me to step in and assist him with the Hyper-V Modules. Over these posts we will learn how to create a virtual machine using both the Hyper-V Management Snap-in and some PowerShell scripting which can lead onto auto provisioning, however, that's for a different topic!
Configuring virtual hard disks, and the benefits of dynamic and fixed VHDX files and the difference between VHD and VHDX and finally we will look into virtualised networking and the difference between, External, Internal and Private and what the benefits of each are.
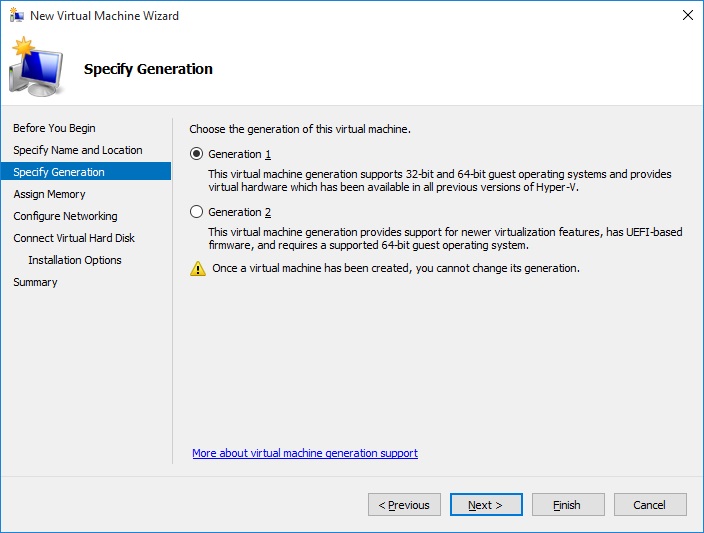
- Create and Configure Generation 1 and 2 Virtual Machines
- Configure Dynamic Memory
- Configure Smart Paging
- Configure Resouce Metering and QoS
- Configure Guest Integrated Services
- Configure Enhanced Session Mode
- Configure RemoteFX
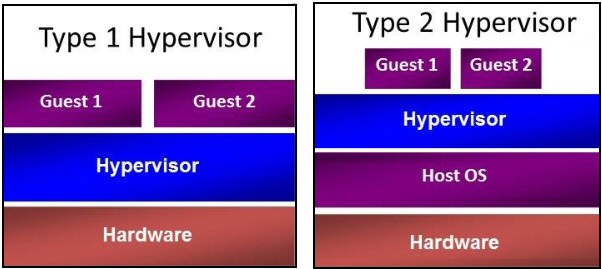
Understanding Virtualization Type 1 and 2
Before we start looking onto creating a virtual machine, let's first go through the two different types of virtualization
Type 1 - Bare Metal
Baremetal Virtualisation is normally associated with the side with products such as Hyper-V, vSphere and XenServer. this means that the virtualization software runs on a physical server and then you build your environment on top of it.
Type 2 - "Embedded" hypervisor
Whereas type 2 or "embedded hypervisor" is associated with products such as VMware Workstation and VirtualBox or Parallels Desktop, where you install an application which runs onto of our desktop OS, type 2 virtualization is good for testing and learning in for the exam a lab, or playing with Linux distros.
Create and Configure Generation 1 and 2 Virtual Machines
Virtualization allows you to run multiple servers on one physical host. This allows your organization to save on money and rack space.
So you can install the Hyper-V Role from either Server Manager or using PowerShell.
From Server Manager
Server Manager > Add Roles > Hyper-V > Restart ServerRestart Server
From PowerShell
Install-WindowsFeature -Name Hyper-V -Restart-Verbose
The Hyper-V Manager is the main page for creating, editing and managing virtual machines, the next step up from the hyper-v manager would e the System Center Virtual Machine Manager or SCVMM.
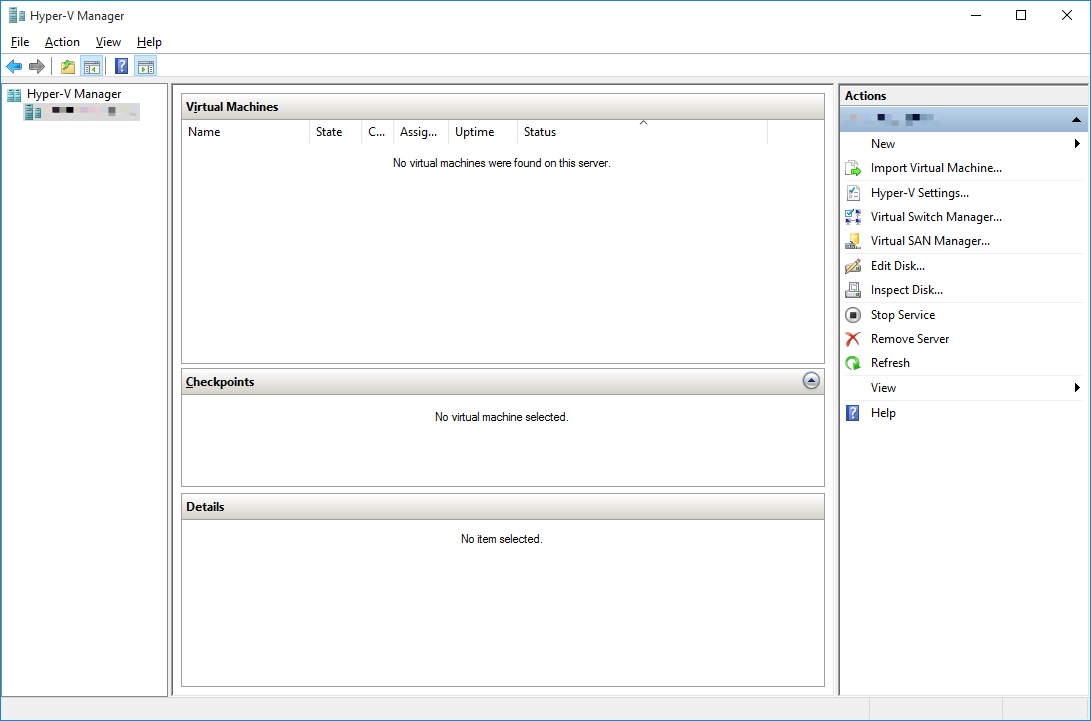
So to create a first virtual machine we need to navigate to the New Tab under the Actions Pane.
Creating a Generation One Virtual Machine
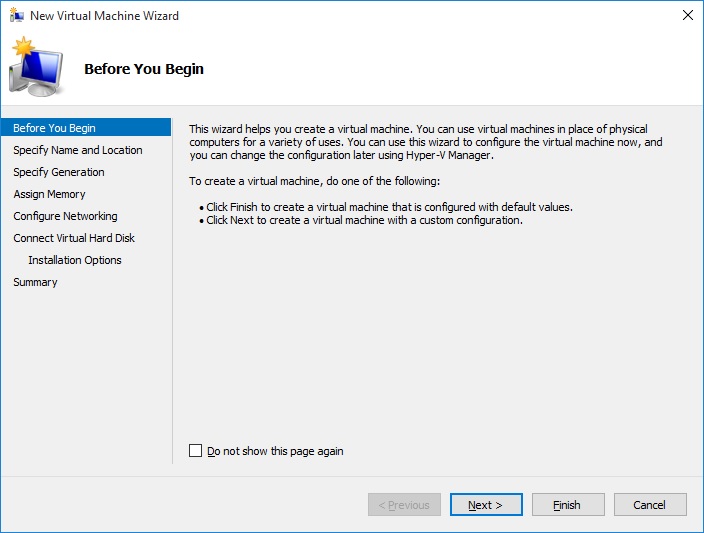
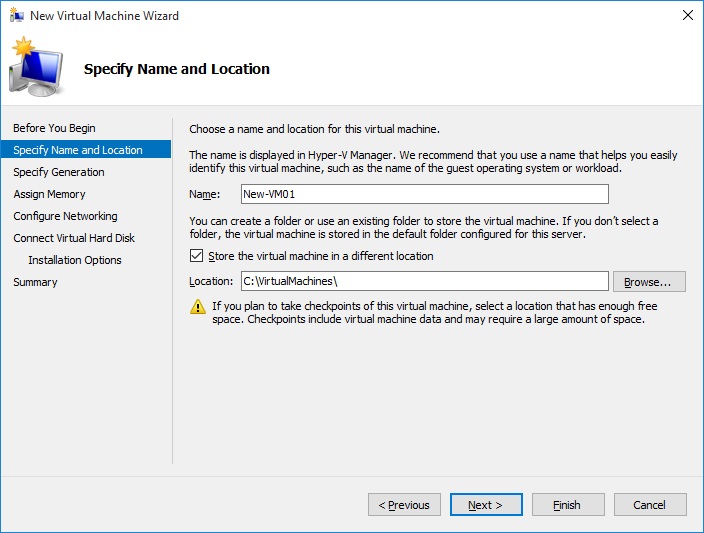
Step One - Configure Virtual Machine Name and Location
Step Two - Configure Virtual Machine Generation
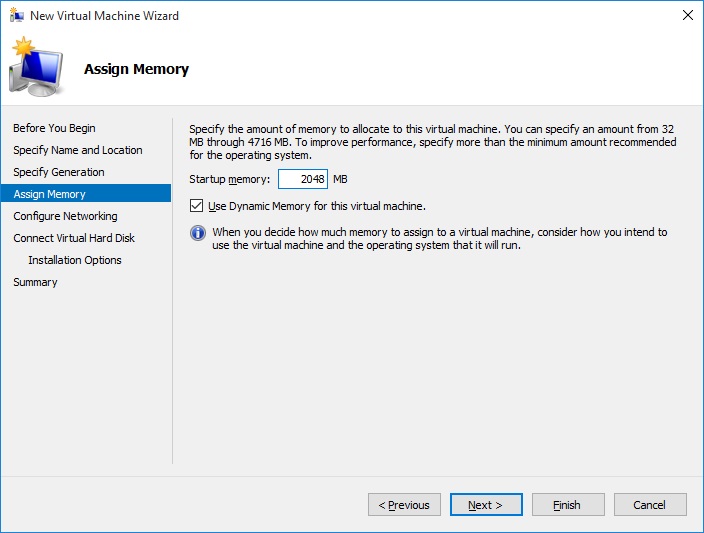
 Step Three - Configure Virtual Memory
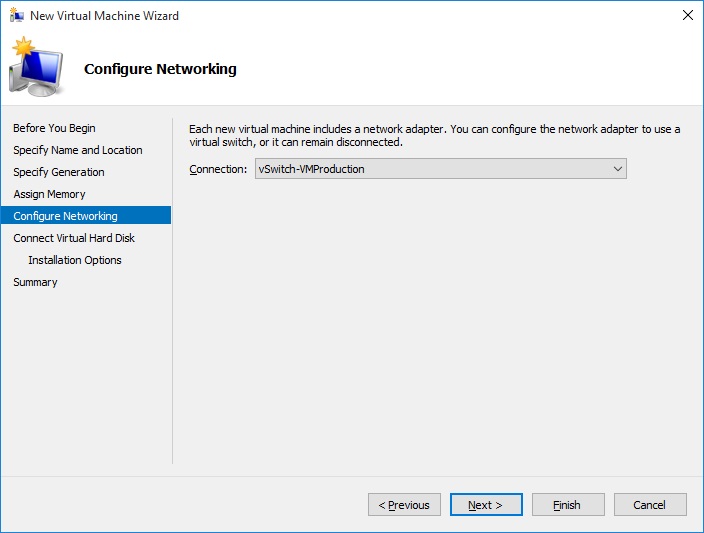
Step Four - Configure Virtual Network Adapter
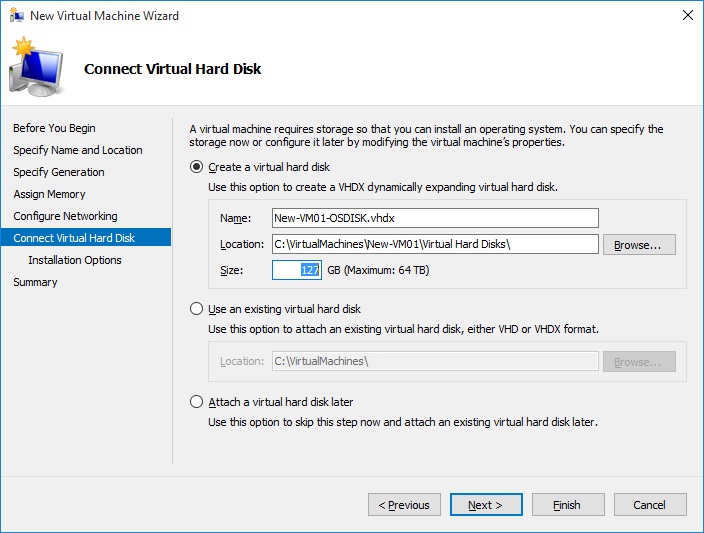
Step Five - Configure Virtual Hard Disk
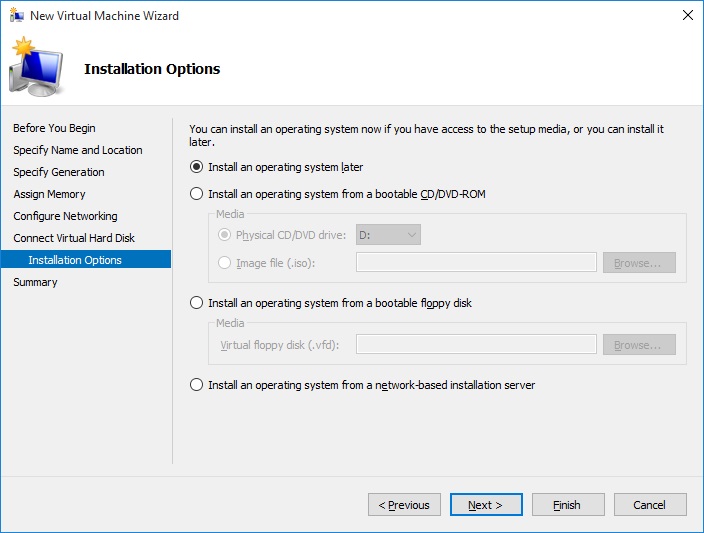
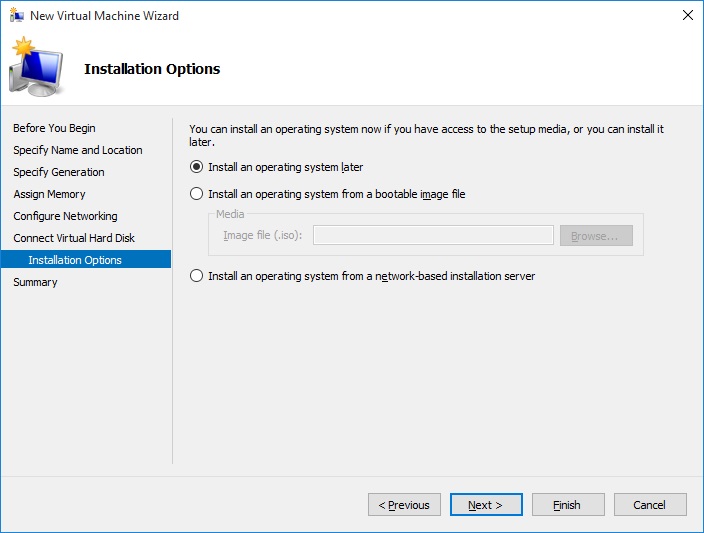
Step Six - Configure Boot Options
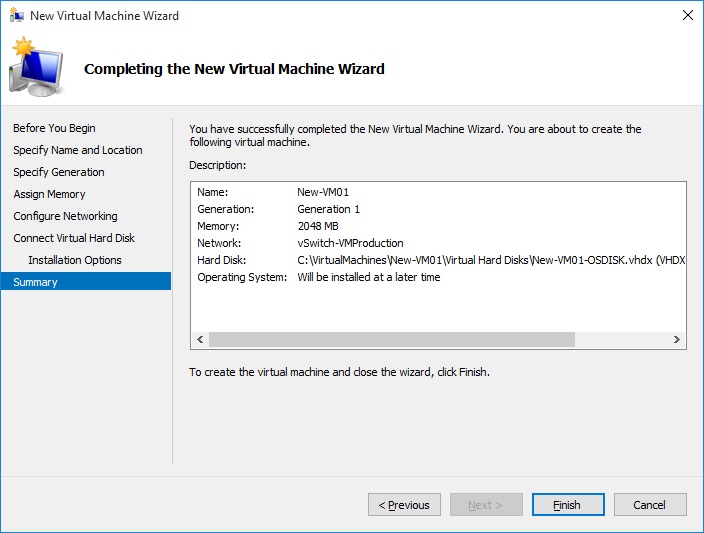
Hyper-V Generation One Summary
Creating a Generation Two Virtual Machine
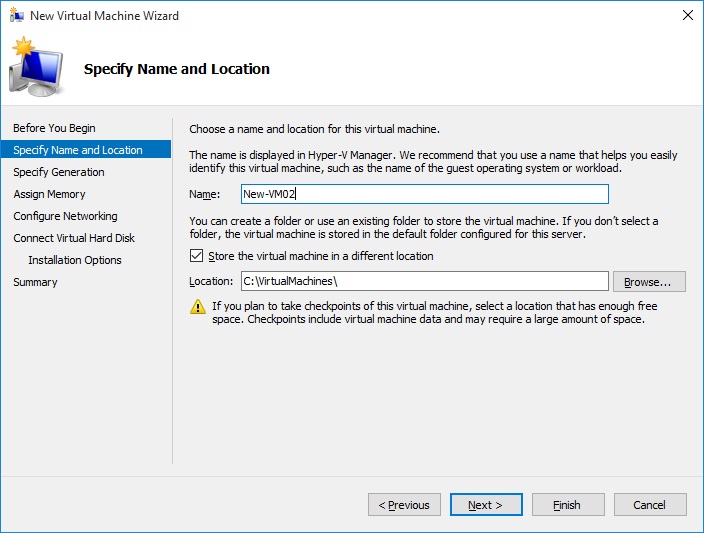
Step One - Configure Virtual Machine Name and Location
Step Two - Configure Virtual Machine Generation

Step Three - Configure Virtual Memory
Step Four - Configure Virtual Network Adapter
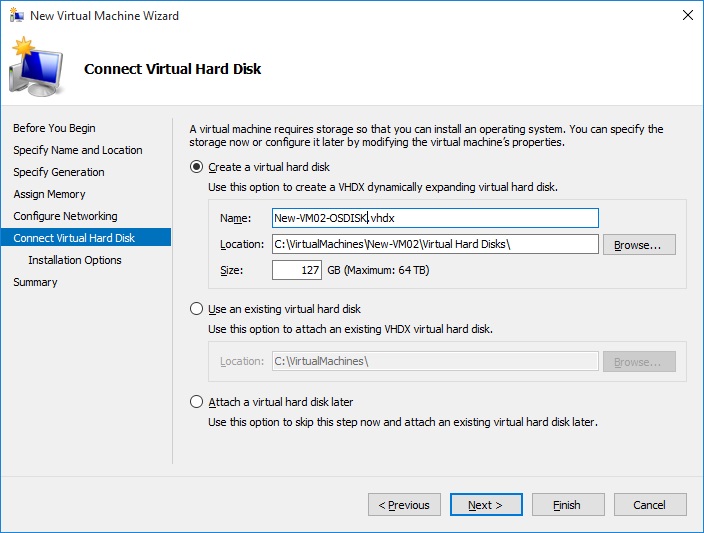
Step Five - Configure Virtual Hard Disk
Step Six - Configure Boot Options
Hyper-V Generation Two Summary

Now we have two virtual machines, a generation one and a generation two virtual machine.
Configure Dynamic Memory
Using Dynamic Memory allows you to share virtual memory between virtual machines, there are various pros and cons to using the feature on hyper-v. for example, if you have a host which has limited resources, you might enable dynamic memory on some virtual servers which are not running mission critical services. I must stress the
For example, if you have a host which has limited resources, you might enable dynamic memory on some virtual servers which are not running mission critical services. I must stress the
I must stress the mission critical part as otherwise you performance issues on your virtual servers, you have a monitoring service like Nagios or Spiceworks Network Monitor, you will get alerts saying that you are running out of virtual memory and for the worst case your virtual server will lock up and you would have to force reboot it!
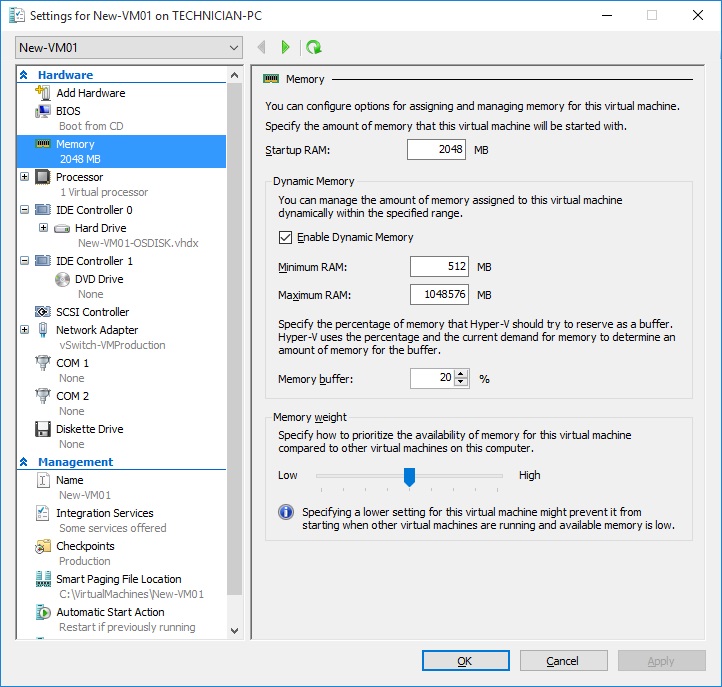
However to configure the dynamic memory feature you need to open the settings windows (as shown above) and then navigate down to the Memory Tab, by default the mic memory is set to enable and the minimum of 512mb and a maximum of 1048576mb. this can be changed I normally leave the default minimal value at 512mb for noncritical servers and then configure the maximum value he role of the server and what roles and features are.
This can be changed I normally leave the default minimal value at 512mb for noncritical servers and then configure the maximum value he role of the server and what roles and features are.
Finally, we have the Memory Weight Management,
When you configure this value, it means that on reboot the virtual machine with the highest value will force take memory from other virtual machines, this can be used in an example of an SQL Server which might require 4Gb to start from a cold boot, but once its warmed up it would release the used memory back to the other virtual machines.
Configure Smart Paging
Hyper-V Smart Paging is used along side with dynamic memory. Prior to 2012R2 Hyper-V release, when you enabled dynamic memory on virtual machines, sometimes when you attempted a reboot, the VM might fail because it runs out of available ram to call upon. however in 2012R2, this was fixed by introducing the Smart Paging system, which in short populates the local VHDX with temporary files helping the virtual machine to reboot. once the system is back online these files are removed.
However, you would also be right in thinking that wait if these files are being written to the vhdx file - won't I have some kind of performance degradation?
Well the answer would be yes, but it, however in 2012R2, this was fixed by introducing the Smart Paging system, which in short populates the local VHDX with temporary files helping the virtual machine to reboot. once the system is back online these files are removed. However, you would also be right in thinking that wait if these files are being written to the vhdx file - won't I have some kind of performance degradation? Well the answer would be yes, but it
Once the system is back online these files are removed. However, you would also be right in thinking that wait if these files are being written to the vhdx file - won't I have some kind of performance degradation? Well the answer would be yes, but it shouldn't be noticeable to any end user, you might notice something if you were running some kind of monitor system like Nagios or Spiceworks Network Monitor.
Configure Resource Metering
Hyper-V Resource monitoring allows you to check what resources your virtual machine is using.
this allows you to make sure that all your virtual machines are running happily and not having any issues!
to enable, configure and use the VMResourceMonitoring service you need to open a PowerShell Window.
For a Basic Virtual Machine Report, we can use the Get-VM -VMName GEN2-VM

As you can see this gives a basic output showing the uptime of the virtual machine, and the Fixed Memory Assignment. however if you want a more detailed report you can use the pipe function | Format-List -Property *
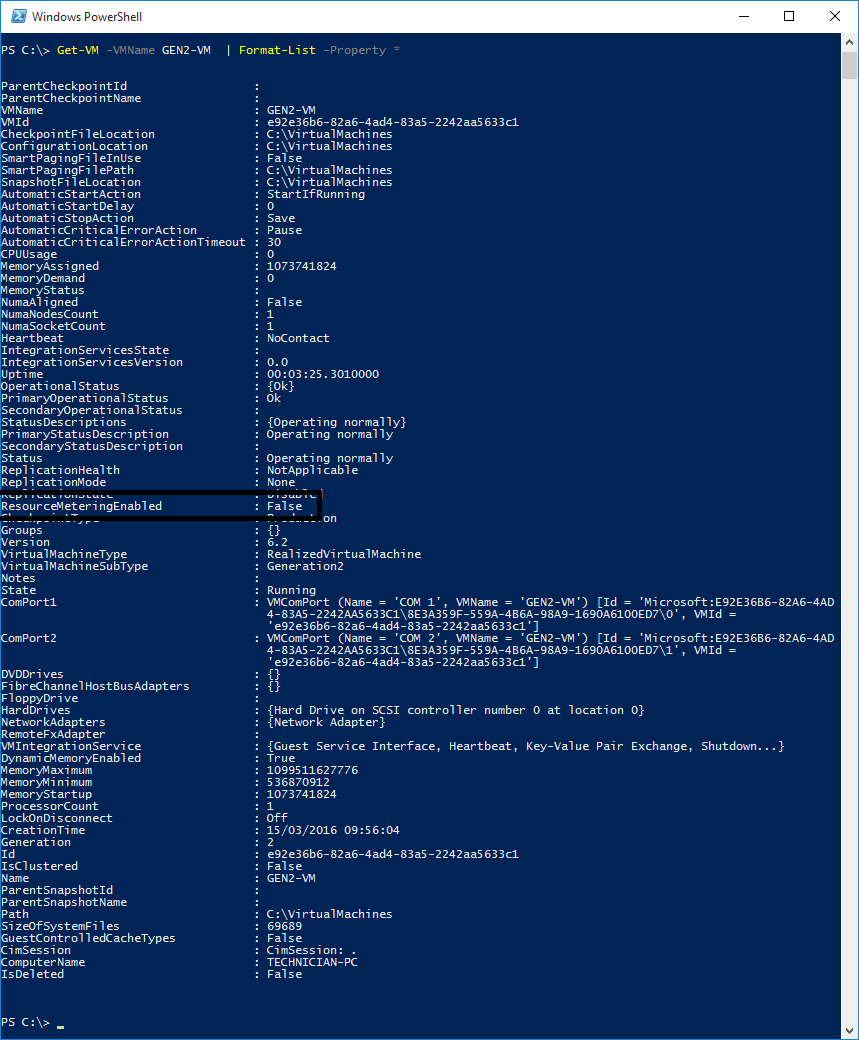
As you can see in the picture above you can see that Resource Metering is currently disabled on the virtual machine . so to enable virtual machine Resource Metering
Enable-VMResourceMetering -VMName GEN2-VM
to check that you have enabled the resource metering on the virtual machine you can type this command
Get-VM -VMName GEN2-VM | Measure-VM

and finally, if you wish to disable the resource metering you just have to use the command
Disable-VMResourceMetering -VMName GEN2-VM
Configure Guest Integrated Services
The Integrated Services for hyper-v allows your virtual machine to have integration with the host bus, which can allow you to pass files and folders to the virtual machine even if the virtual machine is on a private isolated network, this can be done by taking advantage of the Copy-VMFile Command (TechNet Article)
The Six Guest Services provided by Microsoft are:
Operating System Shutdown: The operating system shutdown service provides a mechanism to shut down the operating system of a virtual machine from the management interfaces on the host or management computer. This allows the Hyper-V administrator the ability to initiate an orderly shutdown of the virtual machines without having to log into the virtual machine. The virtual machine will attempt to close open processes and write to disk any data in memory before shutting down the virtual machine
Time Synchronization: This allows you to sync with a network time service (NTP) However it is recommended that you disable this option for domain controllers as it has been known to cause issues with time sync.
Data Exchange: The data exchange service, also known as key-value pairs (KVP), allows for the sharing of information between the host and virtual machine. General information about the virtual machine and host is automatically generated and stored in the registry for virtual machines running Windows and in files for virtual machines running Linux.
Heartbeat: This service helps you identify running virtual machines that might have stopped responding. You can check the heartbeat status of a virtual machine on the Summary tab of the Virtual Machines details page or you can use the Get-VMIntegrationSerivce cmdlet. For additional information about the see Get-VMIntegrationService.
Backup (Volume Shadow Copy): The backup service enables consistent backup of the virtual machines from backup software running on the host. The backup service allows for the virtual machine to be backed up while it is running without any interruption to the virtual machine or the services running on the virtual machine
Guest Services: The guest service allows the Hyper-V administrator to copy files to a running virtual machine without using a network connection. Beforehand the only way to copy files to the virtual machine was for both the virtual machine and the host be connected to the same network and then either use file services to copy the file or to create a remote desktop session to the virtual machine and copy files via RDS session.
Configure Enhanced Session Mode
Following on from the Guest Integrated Services Module - you need to enable the Enhanced Session Mode under the Hyper-V Server Settings and secondly you need to have the Guest Services option enabled to take advantage of the Enhanced Session Mode.
Firstly we need to enable the Enhanced Session Mode under the Hyper-V Settings.
Hyper-V Setting -> Enhanced Session Mode Policy [X]
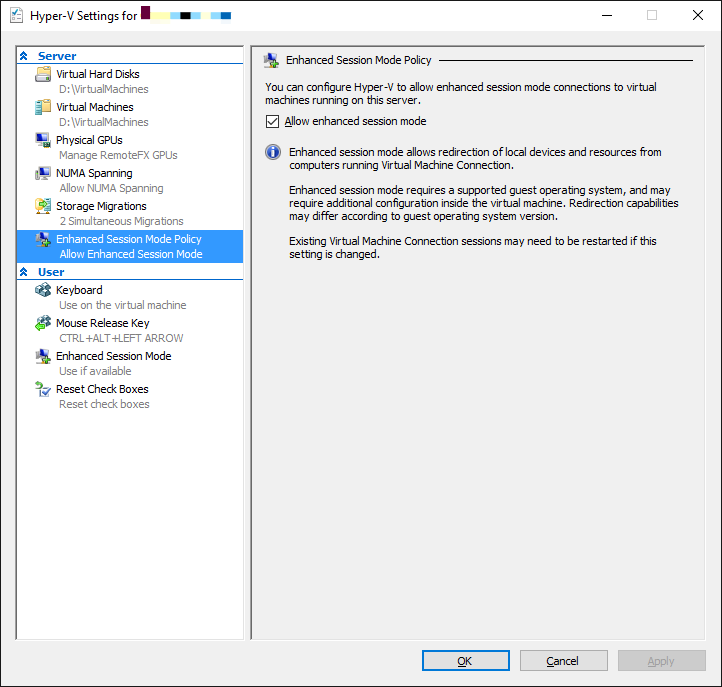
What is Enhanced Session Mode?
Using the Enhanced Session Mode you gain the ability to access a computer’s local resources, like removable USB flash drive, Locally Connected Printers, Sound and Audio. Plus you have the ability to use the Copy/Paste Clipboard - directly from inside a VM, which is very useful when needing to copy lines of code, bug reports or text. When you use Virtual Connection Manager (VMConnect) you can specify what features you want to use during that session, if you wish to keep the same configuration every time you connect to that single virtual machine (VM) then there is an option to save the configuration and use it every time.
Configure RemoteFX
RemoteFx takes use of a physical graphics card unit which is installed on the server, and then allows the device to pass through to a virtual machine, this is mainly used in Remote Desktop Service scenarios or VDI scenarios or where you need graphics power for building 3D Models or rendering videos or applications.The Graphics Cards requirement for RemoteFx are:
The Graphics Cards requirement for RemoteFx are:
- DirtectX 11+
- Second Level Address Translation (SLAT)
- Remote Desktop Virtualization Host (Remote Desktop Service Role)


