
In today's post, we will be looking at how to change VCSA IP Address. Recently, I was working with one of the users and we had to change VCSA IP Address.
Bear in mind, that there are certain prerequisites that need to be taken care of when performing this activity. Although I do not recommend this, but under certain scenarios, you would have to perform this change.
The reason I do not recommend this change is because the components dependent on the VCSA might stop working and will have issues.
Prerequisites to change VCSA IP Address
There are a couple of prerequisites that needs to be taken care of when you change VCSA IP Address.
- The system name of the VCSA appliance should not be an IP Address. During the initial deployment of the VCSA, it should be deployed with the FQDN, otherwise, you will not be able to change VCSA IP Address.
- The user account that is used to perform the change should be a member of SystemConfiguration.Administrators group in vCenter Single Sign-On.
How to change VCSA IP Address
Now, we will move on to the actual task wherein we will change the IP Address of the VCSA appliance.
There are a couple of places that we could make this change, we will look at both.
From vSphere Web Client
Log in to the vSphere Web Client using the URL https://appliance-IP-address-or-FQDN/vsphere-client. Replace this with your vCenter FQDN or the IP Address.
Click on Administration > System Configuration > Nodes > Select node and click Manage tab > then Select Networking > Edit > Expand DNS
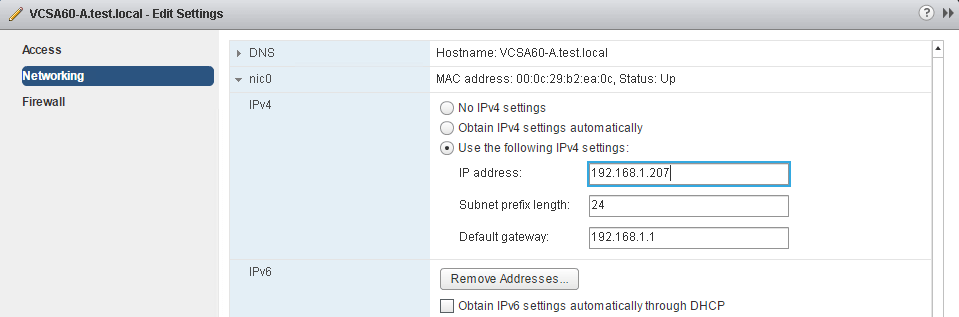
Now provide the new IP Address for the VCSA appliance and click on OK.
Next, you will need to create an A record for the new IP address in your DNS server for both the Forward and reverse lookup zones.
Remove the entry for the old IP Address from the DNS server. Restart the DNS service to remove any cache if present.
Once all these changes are done, you will need to reboot the VCSA appliance and wait until all the services have been restarted and then log in to the Web Client.
From the VAMI page
You could also make use of the VAMI page to change VCSA IP Address. Follow the below steps if you are going to do this from the VAMI page.
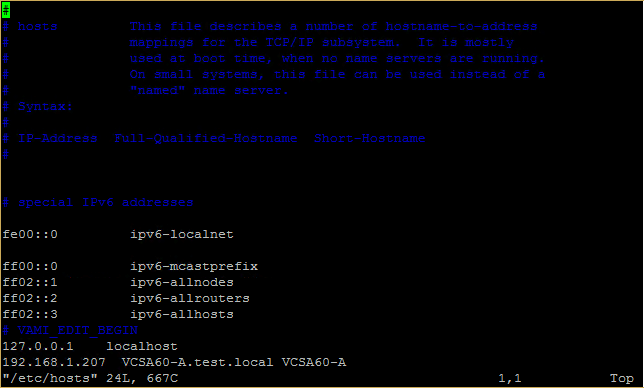
Login to the VCSA appliance using SSH. Navigate to the /etc/ folder and edit the hosts file using vi editor.
Change the IP address to the new address that you would like as seen below and save the file.
Create a new A record and delete the old one as explained in the previous section and restart DNS service on the DNS server.
Login to the VCSA using VAMI https://appliance-IP-address-or-FQDN:5480 using the root credentials.
Click on Networking > Networking Interfaces > Edit
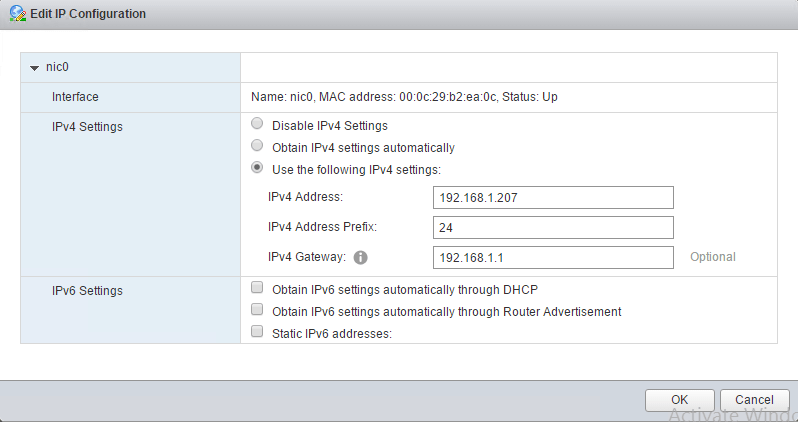
Change the IP Address and click on OK to save the changes.
Reboot the VCSA appliance and login to the Web Client once more to see the changes.
You might receive an error message when you try to change VCSA IP Address as seen below.
"IPv4 configuration for nic0 of this node cannot be edited post-deployment."
Unfortunately, this is due to the fact that IP Address was used during the deployment of the VCSA as the system name.
During the initial configuration of the VMware vCenter Server Appliance, the system name is used as the Primary Network Identifier.
Well, that is all I have for today. I hope this has been informative and thank you for reading!
Related Articles:


