In today's post, we will look at the vSphere Authentication Proxy Service in vSphere 6.5. vSphere Authentication Proxy is used to create Active Directory accounts on behalf on ESXi hosts.
Before the release of vSphere 6.5, the vSphere Authentication proxy had to be installed on a separate Windows machine. In vSphere 6.5, it is part of the vCenter Server (Windows/Linux).
Without the vSphere Authentication Proxy, each ESXi host has been to be added to AD domain using the Active Directory credentials.
With vSphere Authentication Proxy, the setup needs to be performed once and it stores the Active Directory credentials to join the ESXi hosts to the AD domain.
You might wonder what are the advantages of vSphere Authentication Proxy? It removes the need to storage Active Directory credentials in the host configuration.
And if you are using Auto Deploy, the vSphere Authentication Proxy IP address can be used to create the AD accounts for the ESXi hosts.
Now that we have an understanding of the vSphere Authentication Proxy, let us see how to enable the service.
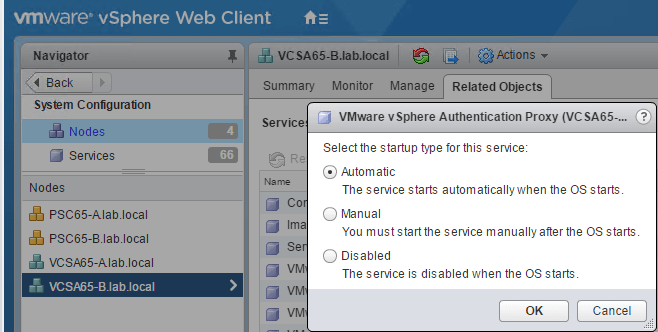
Log into the Web Client and go to Administration > System Configuration > Nodes > vCenter Node > Related Objects
Select the VMMware vSphere Authentication Proxy Service and click on Edit Startup Type and change to Automatic.
Now click on the Green Arrow to start the service.
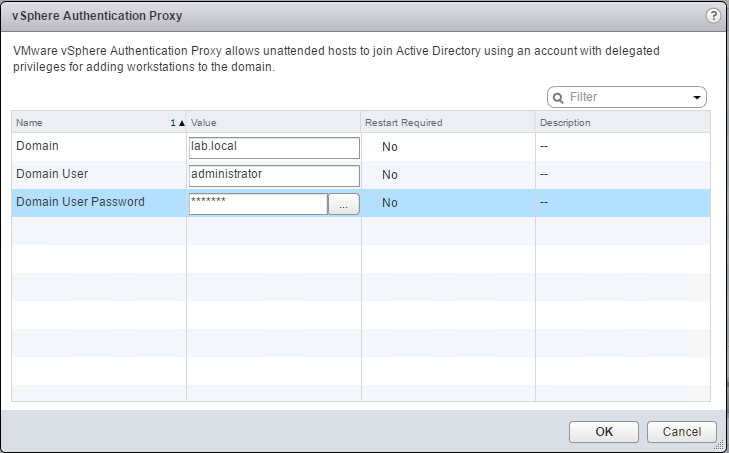
Select the vSphere Authentication Proxy Service from the same page, you will be taken to the configuration page.
Click on the Edit button to start configuring the service.
Provide the Domain Name, Domain user, and password that has appropriate permissions to create accounts in the AD domain.
We have now configured the vSphere Authentication Proxy, click on an ESXi host that needs to joined to the Domain.
Before we join the host to the Domain using the vSphere Authentication Proxy, we have to import the certificate into the ESXi host.
The certificate can be found in the below locations for the vCenter Appliance and the Windows vCenter Server.
- vCenter Server Appliance: /var/lib/vmware/vmcam/ssl/rui.crt
- vCenter Server Windows: C:\ProgramData\VMware\vCenterServer\data\vmcamd\ssl\rui.crt
You can now upload this certificate to one of the datastores that the host can access to. In my case, I am uploading to the location /vmfs/volumes/ISOs/vmcam
Now the certificate can be imported to the ESXi host by navigating to Configure > Authentication Services > Import Certificate
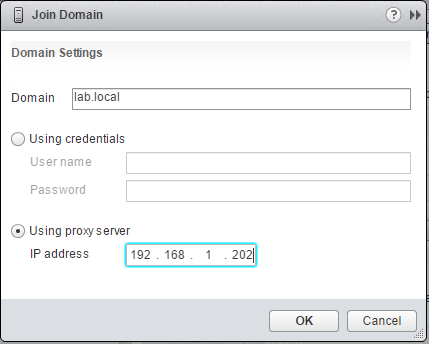
Click on Configure > Authentication Services > Join Domain. Provide the Domain Name and IP address of the vCenter Server on which the service on enabled in the previous step.
The host is successfully added to the Domain and there will be a Computer Account created for the ESXi host in the AD domain.
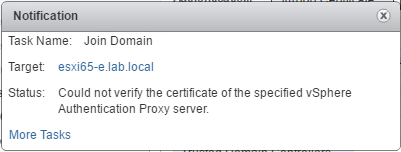
Note: If you do not import the certificate to the host, you will receive an error message which says "Could not verify the certificate of the specified vSphere Authentication Proxy server"
You can get around this message if you wish not to import the message by changing the Advanced Setting of UserVars.ActiveDirectoryVerifyCAMCertificate to 0. The default value is 1. (Not recommended)
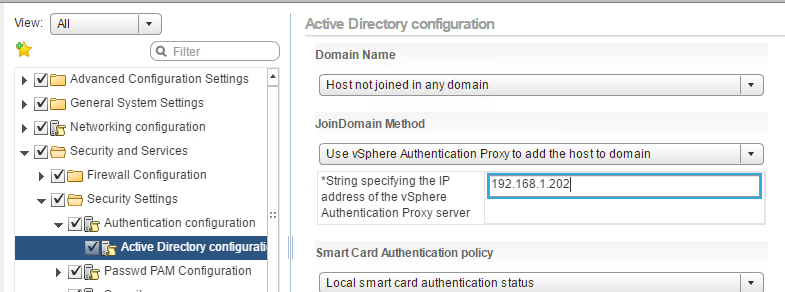
And if you are using Auto Deploy for your ESXi hosts, you can create a Host Profile from a reference ESXi host that is already using vSphere Authentication Proxy.
The setting should be as seen below.
Any host that now boots using Auto Deploy will automatically be added to the AD domain.
I hope this has been informative and thank you for reading!





4 Comments
Thanks so much for sharing this excellent info! I’m seeking forward to see much more posts!
Thank you.
Hi
I am getting this error when I join it via authentications proxy on VC Appliance.
The specified vSphere Authentication Proxy server is not reachable, or has denied access to the service.
Any idea
Same error here did you manage to resolve?