
Hello Folks,
First of all, I want to wish everybody a Happy New Year. It's been awhile I wrote any articles because I have been testing a few things in my lab and this series is to be one of the things I was testing. So today we will be discussing on how to configure PSC HA in a vSphere 6.5 environment.
I am first going to give you run down of my environment. I have two external Platform Services Controllers (PSCs) and two vCenter Servers pointed to one of the PSCs.
- PSC65-A.lab.local - 192.168.1.211/24
- PSC65-B.lab.local - 192.168.1.212/24
- VCSA65-A.lab.local - 192.168.1.201/24
- VCSA65-B.lab.local - 192.168.1.202/24
The Virtual Machine names are pretty self-explanatory. I have the IP addresses set up as shown above. This configuration of PSC HA assumes that you have a new vSphere 6.5 environment set up.
I would also like to bring this everybody's attention that all of the VMs are appliances and not Windows based machines. Most of the steps will be the same for Windows based PSCs as well.
There are a couple of prerequisites that I am going to show in this article as the setup is going to be very basic and there are plenty of articles available online for the same.
Firstly, you will have to install the primary external Platform Services Controller node (PSC65-A.lab.local). Then deploy the secondary SSO node (PSC65-B.lab.local) as a replication partner to the primary Platform Service Controller node.
My Load Balancer FQDN is going to be PSC-LB.lab.local with the IP Address 192.168.1.217/24. Make sure that all of the machines are resolvable using DNS server in the domain.
Now let us move on to the main part of the PSC HA configuration wherein we need to first create a Certificate Signing Request (CSR) from one of the PSC's.
Log in to one of the PSCs using the root credentials. Create a directory called certs under the root directory. Next step is to create a configuration file which will be used to generate the CSR, the file name will be psc_ha_csr_cfg.cfg.
Using the vi editor, create this file and edit the subjectAltName and commonName fields.
I have highlighted them in red below. The subjectAltName should contain the FQDNs of both the PSCs and the FQDN of the Load Balancer.
The commonName field will contain the FQDN of the Load Balancer.
[ req ]
distinguished_name = req_distinguished_name
encrypt_key = no
prompt = no
string_mask = nombstr
req_extensions = v3_req
[ v3_req ]
basicConstraints = CA:false
keyUsage = nonRepudiation, digitalSignature, keyEncipherment
subjectAltName = DNS:psc65-a.lab.local, DNS:psc65-b.lab.local, DNS:psc-lb.lab.local
[ req_distinguished_name ]
countryName = IN
stateOrProvinceName = State
localityName = City
0.organizationName = Company
organizationalUnitName = Department
commonName = psc-lb.lab.local
Save the file and run the below command to generate the CSR and the key file. The file CSR file will be called psc-ha-vip.csr and the key file will be called psc-ha-vip.key
openssl req -new -nodes -out /certs/psc-ha-vip.csr -newkey rsa:2048 -keyout /certs/psc-ha-vip.key -config /certs/psc_ha_csr_cfg.cfg
Next step is to obtain the certificate using the CSR that was generated in the previous step.
In my environment, I am using a Microsoft Root CA and I am not going to get into the details of how to create the CA and the steps to generate the certificates.
Below is the KB article that covers those topics for those who are not aware of how to do this. Basically, create the certificate using the CSR using a pre-defined template for VMware related certificates.
Obtaining vSphere certificates from a Microsoft Certificate Authority -> https://kb.vmware.com/kb/2112014
After performing the above steps, you will have two certificates that will be created. Once is the Machine_SSL certificate for the PSC and the second is the Root CA certificate.
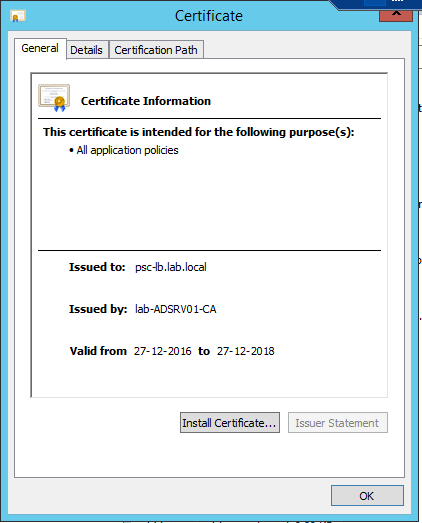
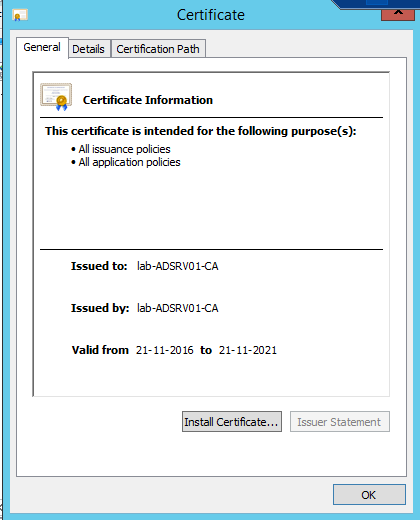
Rename the certificate files to psc-ha-vip.crt and CustomRootCA.crt. Upload the certificates to the PSC appliance using a utility like WinSCP.
Before opening a session to the appliance using WinSCP, run this command on the PSC so that it start a session successfully.
chsh -s root /bin/bash
We now have two certificates uploaded to the PSC appliance, run the below commands to create proper chains that we will be using to replace the existing certificate of the PSC appliances.
The below commands will give us the psc-ha-vip-chain.crt certificate.
cat /certs/psc-ha-vip.crt >> /certs/psc-ha-vip-chain.crt
cat /certs/CustomRootCA.crt >> /certs/psc-ha-vip-chain.crt
This command will give us the cachain.crt file.
cat /certs/CustomRootCA.crt >> /certs/cachain.crt
Note: If there are any intermediate certificate authorities, then you will have to run the following commands to create the cachain.crt file. Same applies to the psc-ha-vip-chain.crt as well, add the first two lines before the final line.
cat /certs/CustomInterCA1.crt >> /certs/cachain.crt
cat /certs/CustomInterCA2.crt >> /certs/cachain.crt
cat /certs/CustomRootCA.crt >> /certs/cachain.crt
We have finally reached the stage wherein we have all the files required to replace the PSC certificates. The three files that are required for the process are:
- psc-ha-vip-chain.crt
- cachain.crt
- psc-ha-vip.key
Before continuing to the next step, make sure that you have these three files and are present in the /certs directory on the PSC appliance.
Moving on, let us start the Certificate-Manager utility on the Platform Services Controller using the below command.
/usr/lib/vmware-vmca/bin/certificate-manager
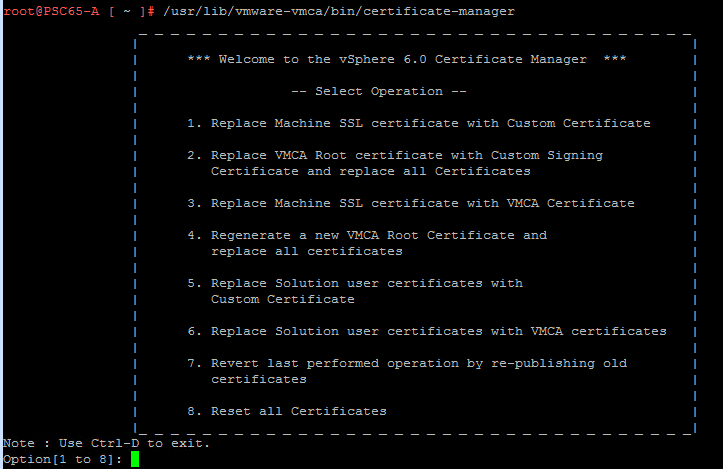
Select option 1, use the default [email protected] account and provide the password for the same.

From here select option 2 since we have already created the certificates required to replace the existing Machine SSL certificate.
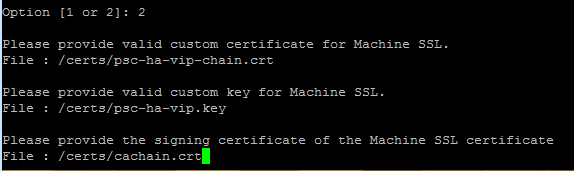
As shown above, provide the details about the three files and hit Enter to start the certificate replacement.
If you have followed all the steps correctly, the certificate will be replaced successfully. Use the same three files and replace the certificate on the second PSC as well.
In the next post, we will be looking at how to configure the Load Balancer.
I hope this has been informative and thank you for reading!


5 Comments
Does external PSC’s configured with load balancer truly provide the “traffic load balancing” in 6.5? or is it just for the automatic failover when one fails? I am asking this because, in the initial release of 6 it was not the case
http://www.virtuallyghetto.com/2015/12/what-does-load-balancing-the-platform-services-controller-really-give-you.html
It’s a fail over mechanism as it in vSphere 6.0.
Hi, great series, a question I have, is it necessary to use a signed certificate from an external CA or can the “normal” self-signed certificate be used as well?
Yes, you need external certs.
Ok, thank you.