
This post is on Objective 2.3 - Design and Implement VM Storage of the 70-533 exam. As you can see from the objective, it is all about the storage options that are available of Azure IaaS Virtual Machines.
We will be looking at the below objectives in particular:
- Configure Disk caching.
- Plan Storage capacity.
- Configure Operating system disk redundancy.
- Configure shared storage using Azure File Service.
- Configure Azure File share snapshots.
- Configure Geo-Replication.
- Encrypt disks.
- Implement ARM VMs with Standard and Premium storage.
So, we have a lot to cover in this post and it’s going to be worth if you stay along till the end.
Configure Disk Caching
Azure Virtual Machines that support Premium Storage have host caching capabilities for higher throughput and latency.
There are basically three types of option available for Host caching at this time, which are:
- None: No caching is done, completely relies on the performance of the disks.
- ReadWrite: Stored in the memory of the host OS.
- ReadOnly: Stored on disk and RAM of the host OS.
There are use cases of each of these types. For example, when there is an application where you have more write operations, it is recommended to set it to None. An example of this would be SQL Log files.
For ReadOnly type, an example can be SQL Data files where the requirement is a lot Read operations per second.
Keep in mind, the default disk caching policy for all premium storage is ReadOnly. Let us now try and see where these options are available in the Azure Portal.
Select a Virtual Machine > Disks. This will list all the disks connected to the VM. In my case, I only have the OS disk.
As you can see, there are three options available under Host Caching setting.

Plan Storage Capacity
This is a very generic topic in this section, Microsoft wants you to know what different types of disks and performance tiers are available for Azure Virtual Machines.
I will try and make this into two parts, wherein we will first discuss performance tiers available and then look at the disk types available.
Below is a quick comparison table for Standard and Premium Storage Types.
| Standard | Premium |
| This type is backed by HDD | Premium Storage is backed by SSD |
| IOPS values represent maximum values | IOPS values represent expected performance levels |
| Good for workloads which do not have high read/write operations like Domain Controller, etc. | Great for I/O intensive workloads like Dynamics, Exchange Server, SQL Server etc. |
| Can use any redundancy options | Only Locally Redundant Storage (LRS) available |
| Usually available in all Azure Regions | It may not be available in all Azure Regions |
| Max throughput per disk is 60MB/s | Max throughput per disk is 250MB/s |
| Max IOPS per disk is 500IOPS | Max IOPS per disk is 7500 IOPS |
Now lets quickly check the differences between the managed and unmanaged disks.
| Category | Managed disks | Unmanaged disks |
| Management | Is an ARM (Azure Resource Manager) object (resource) | Is not an ARM resource, but a file (.vhd) residing on an Azure Storage Account. The latter is an ARM object |
| Size | The managed disks sizes are fixed (and can be resized). Which means that you cannot choose a custom size. | You can choose the disk size during the provisioning (and can be resized) when using Standard Storage. |
| Performance | A managed disk have a predictable performance, with Standard storage (500 IOPS) or Premium storage (Depends on the disk). | Only premium storage disks have a predictable performance (depends on the disk). Standard storage has a predictable performance (500 IOPS) unless they are impacted by the Storage Account performance limits (A maximum of 40 disks per standard storage account is recommended, otherwise disks can be throttled). |
| Availability | When placing VMs using managed disks under an Availability Set, disks are placed on different fault domains in order to achieve the better SLA (The Availability Set SLA is only for compute) | When placing VMs using unmanaged disks under an Availability Set, there is no guarantee that the disks are placed on different fault domains, even if they are on different Storage Accounts. |
| Redundancy | LRS | LRS, GRS |
Keep in mind that Microsoft now recommends using Managed Disks because of the obvious advantages. We will be discussing some of the unknown terms above in the upcoming articles.
Configure Operating System Disk Redundancy
Every virtual machine has one attached operating system disk. It's registered as a SATA drive and is labeled /dev/sda by default. This disk has a maximum capacity of 2048 gigabytes (GB).
When you create a virtual machine from an image, Azure creates a disk for the virtual machine that is a copy of the source .vhd file. To protect against accidental deletion, Azure places a lease on any source .vhd file that’s used to create an image, an operating system disk, or a data disk.
Configure Shared Storage using Azure File Service
Azure Files is one of the many services that Microsoft offers in the cloud and they are fully managed file shares in the cloud that are accessible by industry standard SMB protocol.
Azure File shares can be mounted concurrently by cloud or on-premises deployments of Windows, Linux, and macOS.
Azure File Shares can be used for below use cases:
- Replace or supplement on-premises file servers.
- "Lift and shift" applications.
- Simplify cloud development.
The key benefits of Azure File Shares are:
- Shared Access: Since it uses the SMB protocol, it can easily replace the on-premises file servers without any changes to the applications.
- Fully managed: It is completely managed by Azure meaning you don't have to worry about the underlying hardware and the software updates.
- Scripting and tooling: PowerShell cmdlets and Azure CLI can be used to create, mount, and manage Azure File shares as part of the administration of Azure applications.
- Resiliency: Azure Files has been built from the ground up to be always available.
Now that we have understood what is an Azure File Share and what are the use cases and benefits of it, let us go ahead and create one using the Azure Portal.
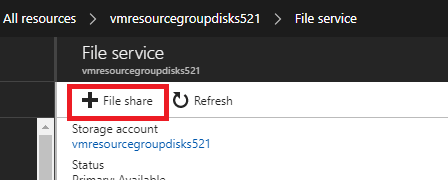
In this example, I will be using the existing storage account. Therefore, select the Storage Account > Overview > Files
Select the + File Share option to create the File Share.
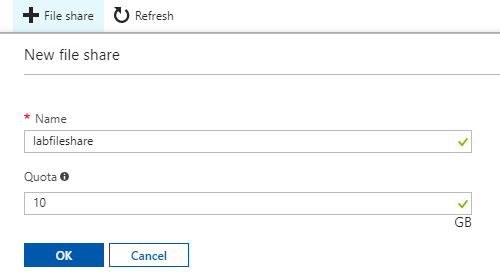
Provide a descriptive Name and the Quota (size) for the share. Max Quota at this time is 5TB.
That's it. The Azure File Share is successfully created. I will add a few files to this share so that we have some data to look at and we will then mount this share to a Windows and a Linux machine.
Select the Share and click on Connect, this will get you the commands that you need to use to connect the share from Windows and Linux.
This will basically show you the details of the storage account and the file share along with the credentials to map the share.
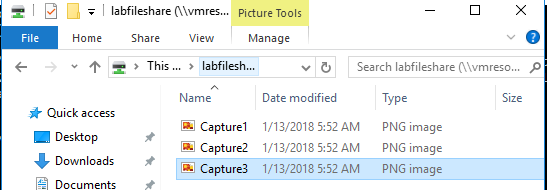
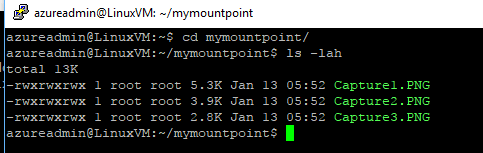
Also, note that I have uploaded three files which we will be able to see from the Windows and Linux machine once we successfully connect to the Share.
After successfully executing the commands on both a Windows and Linux machine, I am able to successfully access the share.
Configure Azure File Share Snapshots
A share snapshot is a read-only version of an Azure Files share that's taken at a point in time. After a share snapshot is created, it can be read, copied, or deleted, but not modified. A share snapshot provides a way to back up the share as it appears at a moment in time.
Below are the use cases for Azure Share snapshots:
- Protection against application error and data corruption.
- Protection against accidental deletions and unintended changes.
- General backup purposes.
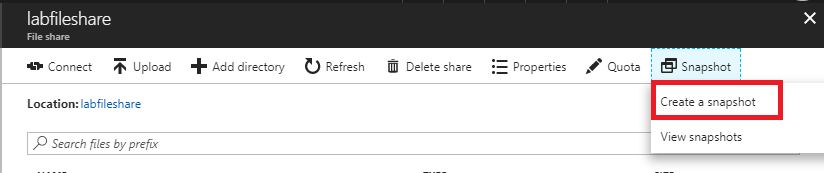
To create a point-in-time share snapshot, go to your file share in the portal and select Create a snapshot.
You can look at all your share snapshots for a file share in the portal and browse to a share snapshot to view its content.
On your file share, under Snapshot, select View snapshots.
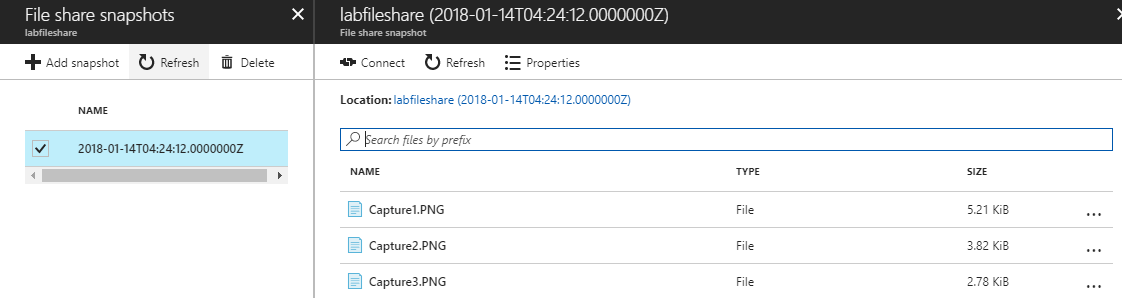
You can download or restore individual files from the share snapshot if you wish.
Now obviously all of this can be done using the Azure PowerShell, Azure CLI 2.0 and also the REST APIs. So feel free to explore those options.
Configure Geo-Replication
You already know that the cloud is very reliable in terms everything it does. Therefore, all the data that resides in your Microsoft storage account is always replicated to make sure that it is available all the time.
Replication copies your data, either within the same data center or to a second data center, depending on which replication option you choose.
When you create a storage account, you can select one of the following replication options:+
- Locally redundant storage (LRS)
- Zone-redundant storage (ZRS)
- Geo-redundant storage (GRS)
- Read-access geo-redundant storage (RA-GRS)
Now there is a post available on Azure documentation site which talks this in detail but I am just going to quickly create a table to remember this at a high level.
| Locally Redundant Storage (LRS) | 3 copies within single data center |
| Only option for Premium Storage type | |
| Zone-Redundant Storage (ZRS) | 3 copies across 2-3 data centers |
| Block blobs only; available only during SA creation | |
| Geo-Redundant Storage (GRS) | 3 copies in primary region |
| 3 copies in the secondary region | |
| Read-Access Geo-Redundant Storage (RAGRS) | RO access to the secondary region data |
Encrypt Disks
The process for encrypting a VM is as follows:
- Create a cryptographic key in an Azure Key Vault.
- Configure the cryptographic key to be used for encrypting disks.
- To read the cryptographic key from the Azure Key Vault, create an Azure Active Directory service principal with the appropriate permissions.
- Issue the command to encrypt your virtual disks, specifying the Azure Active Directory service principal and an appropriate cryptographic key to be used.
- The Azure Active Directory service principal requests the required cryptographic key from Azure Key Vault.
- The virtual disks are encrypted using the provided cryptographic key.
Here is a handy PowerShell script that I found on the Azure Documentation site.
#Setting the variables

$location = 'southindia'
$rgName = 'VMResourceGroup'
$vmName = 'WindowsVM'

#Register the KeyVault Provider to the subscription

Register-AzureRmResourceProvider -ProviderNamespace "Microsoft.KeyVault"

#Create a new KeyVault and enable for disk encryption

$keyVaultName = "LabKeyValut"
New-AzureRmKeyVault -Location $location `
    -ResourceGroupName $rgName `
    -VaultName $keyVaultName `
    -EnabledForDiskEncryption

#Create the cryptographic key in the keyvault

Add-AzureKeyVaultKey -VaultName $keyVaultName `
    -Name "myKey" `
    -Destination "Software"

#Create a service principal in Azure Active Directory

$appName = "My App"
$Password = "P@ssword!"
$securePassword = ConvertTo-SecureString $Password -AsPlainText -Force
$app = New-AzureRmADApplication -DisplayName $appName `
    -HomePage "https://myapp.contoso.com" `
    -IdentifierUris "https://contoso.com/myapp" `
    -Password $securePassword
New-AzureRmADServicePrincipal -ApplicationId $app.ApplicationId

#Set permissions on your Key Vault

Set-AzureRmKeyVaultAccessPolicy -VaultName $keyvaultName `
    -ServicePrincipalName $app.ApplicationId `
    -PermissionsToKeys "WrapKey" `
    -PermissionsToSecrets "Set"

#Encrypt the Virtual Machine

$keyVault = Get-AzureRmKeyVault -VaultName $keyVaultName -ResourceGroupName $rgName;
$diskEncryptionKeyVaultUrl = $keyVault.VaultUri;
$keyVaultResourceId = $keyVault.ResourceId;
$keyEncryptionKeyUrl = (Get-AzureKeyVaultKey -VaultName $keyVaultName -Name myKey).Key.kid;

Set-AzureRmVMDiskEncryptionExtension -ResourceGroupName $rgName `
    -VMName $vmName `
    -AadClientID $app.ApplicationId `
    -AadClientSecret $securePassword `
    -DiskEncryptionKeyVaultUrl $diskEncryptionKeyVaultUrl `
    -DiskEncryptionKeyVaultId $keyVaultResourceId `
    -KeyEncryptionKeyUrl $keyEncryptionKeyUrl `
    -KeyEncryptionKeyVaultId $keyVaultResourceId
Implement ARM VMs with Standard and Premium Storage
This is a topic that we already discussed in the above section called Plan storage capacity.
Basically, Microsoft wants you to understand the merits of each type of Storage tiers and accordingly deploy Azure Virtual Machines.
I hope this was informative and thank you for reading!


3 Comments
Hi,
Are u sure about values of Max throughput per disk and Max IOPS per disk in table Standard vs. Premium Storage? https://azure.microsoft.com/en-us/pricing/details/managed-disks/
Best regards.
I also noted this, it seems some of the table was incorrectly copied.
Apart from that, this is a great introduction into understanding some parts of the exam – thanks!
Updated! Thanks for finding the correction.