It's been awhile that I wrote an article on VMware since I am occupied with the 70-533 Azure series, which you can find here if you are interested.
I had to recently build a few Hyper-V Virtual Machines in my lab setup since I was testing the Rubrik software. I have a single physical ESXi and I am going to running Hyper-V on VMware ESXi.
In this example, I am using a Windows Server 2016 as my host, so the steps might slightly vary for an older version of Windows Server by editing the vmx file.
So let us start from scratch. I am connected to my physical ESXi host using the Embedded Host Client since this is recommended by VMware and the C# is deprecated with ESXi 6.5 officially, but I still find it to work.
You can connect to the Embedded Host Client by using any browser and connecting to the below URL.
https:///<IP address of ESXi>/ui
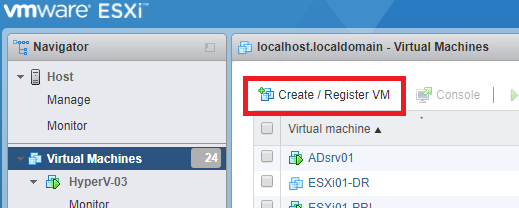
Once connected, click on Virtual Machines section and select Create/Register VM.
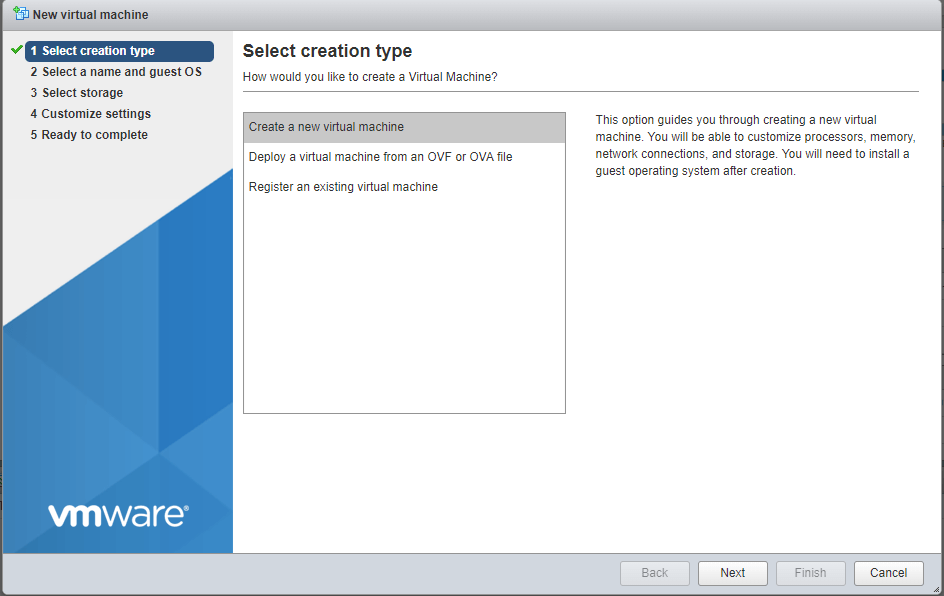
This will bring the New Virtual Machine Wizard. Select Create a New Virtual Machine option and select Next.
Provide a name for the Virtual Machine and select the below options.
- Compatibility: Latest version of ESXi
- Guest OS Family: Windows
- Guest OS Version: Microsoft Windows Server 2016 (64 bit)
Click Next.
Select the datastore on which this VM will reside and click Next.
Select the default configs for now and make sure that the disk provisioning type is Thin since you want to save space on the datastore.
Also, I am attaching the Windows Server 2016 ISO image in this step by attaching the Datastore ISO image that I have already uploaded to one of my datastores.
Click Next.
Review the options that you have selected and click Finish to deploy the VM.
Once the VM is deployed, click on Edit Settings.
Expand the CPU section as shown below and Check the box Expose hardware-assisted virtualization to the guest OS.
Boot the Virtual Machine and make sure that you deploy the Datacenter Edition with the GUI since we are trying to learn Hyper-V concepts by deploying this VM.
Go through the standard Windows installation process. Once done, install the VMware Tools as a best practice and in my case, I have assigned a static IP address and also joined this machine to my AD Domain.
Once all of this done, Click on Add Roles from Server Manager and select the Hyper-V role and Include the Add Features option as well which will help us with Management of the Hyper-V server as shown below.
Go through the process of installing the Role and reboot the Virtual Machine.
Once the VM is rebooted, select the Hyper-V Manager from the Tools section of the Server Manager.
As seen below, you will now be able to deploy VM inside the nested Hyper-V Virtual Machine. Talk about VM Inception! 😀
Now that I will be exploring Hyper-V, expect some articles on this topic.
I hope this has been informative and thank you for reading!


4 Comments
The way you are explaining step by step its really kudos bro. Could you please deeply explain how to create nested vm’s in Hyper-V.
Thank you
I was told by my consultant vendor to NOT do this, “Putting one hyper-visor on top of another is a bad idea.”.
Just wanted to know your opinion if you did/ or are doing for a production environment? or it this only for testing and experimental systems?
Yes, this is not recommended for production setup. I use it only for testing purposes.
VM on hyper-V installed on esxi VM could only hyper-V host IP, could you please advise?