In this post titled 70-533 Objective 1.2 - Configure Web Apps, we will look at the various ways that you can configure Azure Web Apps. In the previous post, we looked deploying Web Apps and it can found here.
The sub-objectives that we will be covering in this post are:
- Define and use app settings, connection strings, handlers, and virtual directories
- Configure certificates and custom domains
- Configure SSL bindings and runtime configurations
- Manage Web Apps by using Azure PowerShell and Azure-CLI
- Manage App Service backups
- Configure authentication and authorization for Web Apps
- Configure Web App notifications
Now let us look at all the sub-objectives one by one and see how we can configure Web Apps.
Define and use app settings, connection strings, handlers, and virtual directories
There are various app settings that are available for an Azure Web App. In our previous post, we created a WordPress on Linux Web App which uses PHP as the framework for the Web App. The various options that are available are:
- .NET Framework: You can select the .NET framework version.
- Java: You can select the Java version or OFF to disable Java. Use the Web Container option to choose between Tomcat and Jetty versions.
- Python: You can select the Python version, or OFF to disable Python.
The Application settings are split into two options, which are:
General Settings
- Always On: By default, web apps are unloaded if they are idle for some period of time. This lets the system conserve resources. In the Basic or Standard mode, you can enable Always On to keep the app loaded all the time.
- HTTP Version: Most modern browsers support HTTP/2 protocol over TLS only, while non-encrypted traffic continues to use HTTP/1.1.
- ARR Affinity. If an app that uses a scale-out mechanism and can run on multiple VM instances, ARR Affinity cookies guarantee that the client is routed to the same instance for the life of the session.
- FTP access: There are three options available, which are FTP + FTPS, FTPS Onlyand Disable. This is to access your Web App.
App Settings
These settings vary depending on the Framework that the App uses. It contains name/value pairs that your web app will load on startup.
For our WordPress App, below are the App settings that are required for the app to be loaded and these settings are accessed as environment variables at runtime.
Connection Strings
Connection Strings are typically used to store the connection information for one or more databases the Web App needs to connect to for storing and retrieving data.
Configure certificates and custom domains
In a Basic or Standard mode, you can upload SSL certificates for a custom domain. To configure certificates, select the Web App > SSL Settings.
If you have your own certificate that you would like to use, you would first come here and upload the certificate. Once the certificate is created, you will have to perform SSL binding.
SSL Bindings let you specify which certificate to use when responding to requests to a specific hostname over HTTPS.
Configure Custom Domains
To map a custom DNS name to a web app, the web app's App Service plan must be a paid tier. Select the Web App > Custom Domains.
To add a custom hostname, click on Add hostname, a new blade comes up where you can provide the details about the hostname and whether an A record to CNAME record needs to be created as seen below.
For a detailed post, you can visit this tutorial here.
Configure SSL bindings and runtime configurations
As explained in the earlier section, you can perform SSL bindings once a certificate is uploaded for use with the Web App.
To create an SSL Binding, go to the Web App > SSL Settings > Add Binding and a new blade would come up as seen below.
Select the hostname and the certificate that was uploaded along with the SSL connection type.
- SNI-based SSL - Multiple SNI-based SSL bindings may be added. This option allows multiple SSL certificates to secure multiple domains on the same IP address
- IP-based SSL - Only one IP-based SSL binding may be added. This option allows only one SSL certificate to secure a dedicated public IP address.
Manage Web Apps by using Azure PowerShell and Azure-CLI
As with most Azure Services, Azure Web Apps can also be managed using both the Azure PowerShell and the Azure CLI.
Microsoft has done a great job of providing with some sample scripts to get you started and the rest is up to the user to perform customizations.
The sample scripts can be found here.
Manage App Service backups
It is possible to backup your Azure Web App both manually and through scheduling. App Service can back up the following information to an Azure storage account and container that you have configured your app to use:
- App configuration
- File content
- Database connected to your app
To perform a backup of your Azure Web App, select the App > Backups > Configure. This brings up a new blade and the following information needs to be provided.
Backup Storage: This is a blob storage container that needs to be specified where the above backup content will reside.
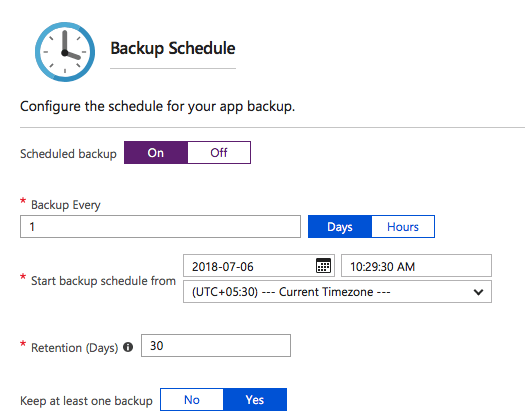
Backup Schedule: There are two options that are available, On or Off. If you select On, you can specify how often you want to back up this Web App.
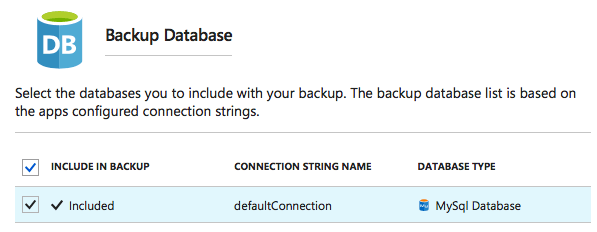
Backup Database: You can choose to backup the database connected to your Web App using this checkbox as part of you App backup.
Configure authentication and authorization for Web Apps
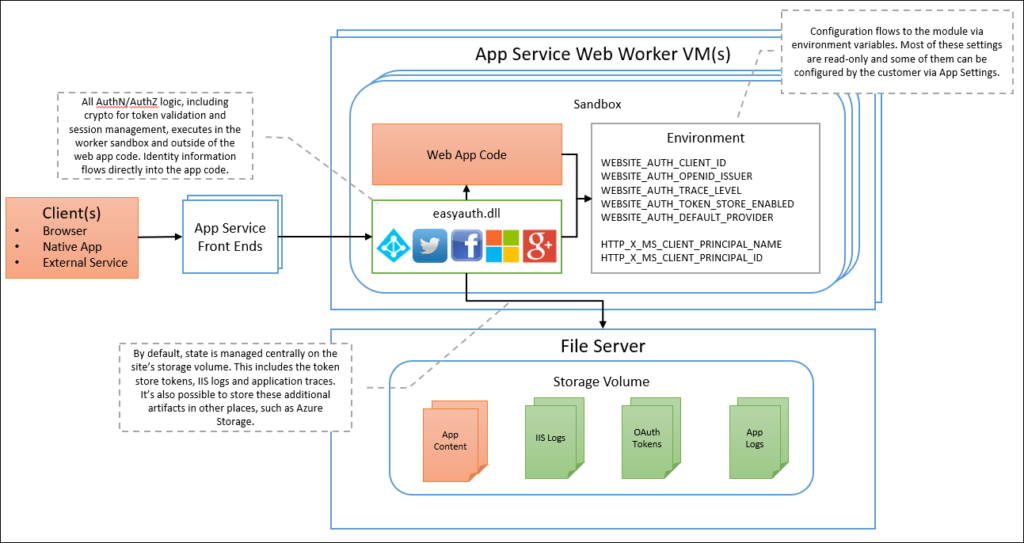
Azure App service provides built-in authentication and authorization support. The authentication and authorization module runs in the same sandbox as your application code. When it's enabled, every incoming HTTP request passes through it before being handled by your application code.
The actual implementation is something that is going to be difficult to explain in this post, but a high-level overview is seen in the below diagram.
A detailed post can be found here.
Configure Web App notifications
Below is a great resource from Azure Friday which explains and demos push notifications in Azure App Service, which is a secure way to use Azure Mobile Apps to integrate mobile apps with Azure Notification Hubs to receive push notifications.
I hope this has been informative and thank you for reading!


