
Welcome to the final post of the Objective 1 of the 70-533 series titled, Objective 1.4 - Configure Web Apps for scale and resilience.
In our previous post, we looked at configuring and monitoring Azure Web Apps and in this post, we will look at the scaling Web Apps and how to make them resilient to failures.
The sub-objectives of this post are:
- Configure auto-scale using built-in and custom schedules
- Configure by metric
- Change the size of an instance
- Configure Traffic Manager
Before we go any further, let us first understand the two scaling options available within Azure for Web Apps.
- Scale Up: Scale Up basically means that you move up the pricing tier of the App Service Plan to add additional resources like CPU, Memory, and Storage to your Web Apps.
- Scale Out: Scale Out is used to scale your apps which means to increase the number of instances.
Now that we have an understanding of these two options, let's dig in.
Configure auto-scale using built-in and custom schedules
In this example, I want to have 3 instances of my Web App on Friday to perform extra workload.
To enable auto-scale on the Web App, you need to first select the Web App > Scale Out > Click on Enable AutoScale.
This will bring up a new blade, click on Add Scale condition, and select Scale to a specific instance count
I am going to give a name to my AutoScale setting and increase the instance count to 3 and select the schedule as Repeat Specific Days and select Friday.
Under Timezone, select the Timezone and also the start and end time for the autoscale to happen. You will also notice that there is a default autoscale rule that is created and I will set the instance count to 1 as I want the Web App to have only 1 instance on all the other days.
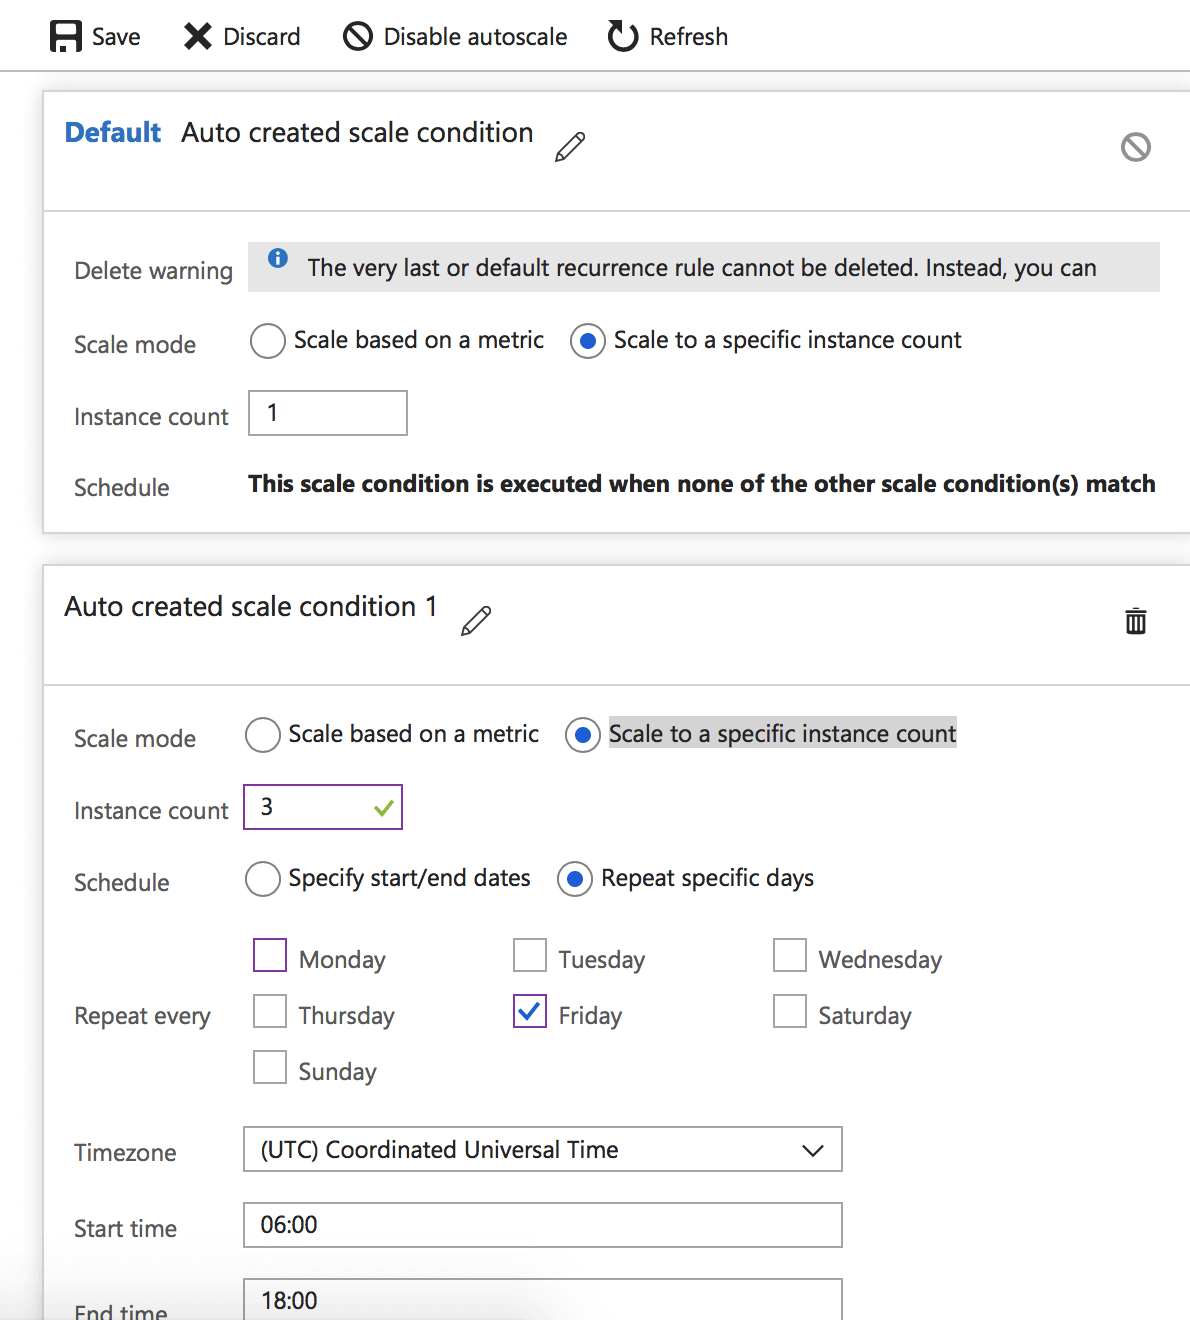
Click on Save to enable and apply the autoscale setting.
Configure by Metric
As explained earlier, there are two ways that you can autoscale your Web Apps, we saw the first method above using the specific instance count, the other method using a metric.
Once the autoscale is enabled, select the Scale condition as metric and click on Add a Rule.
This brings up a new blade where you can specify for what metric that you would like to perform the autoscale operation.
In this example, I am monitoring the CPU usage of the instance and once it increases to 70% and stays for 10 minutes, it will spin up a new instance and once it is below 70% for 5 mins, it will decrease the instance count by 1.
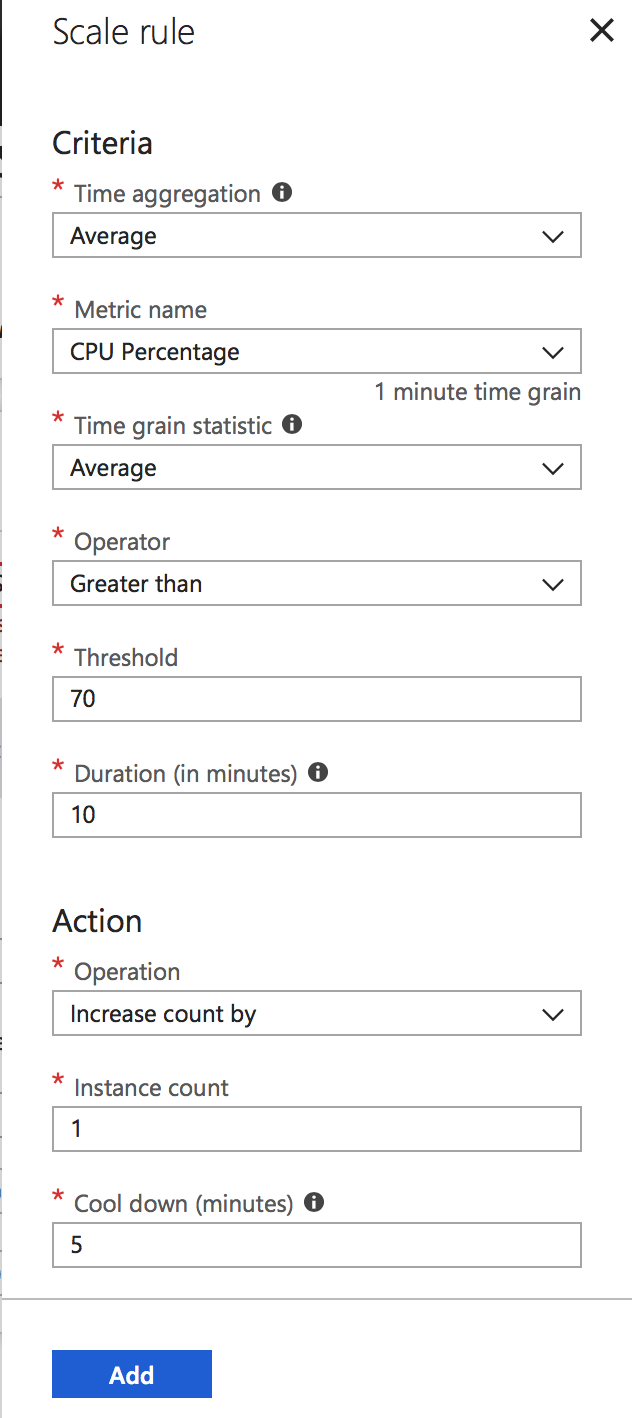
Click on Add for the rule to be added and click on Save.
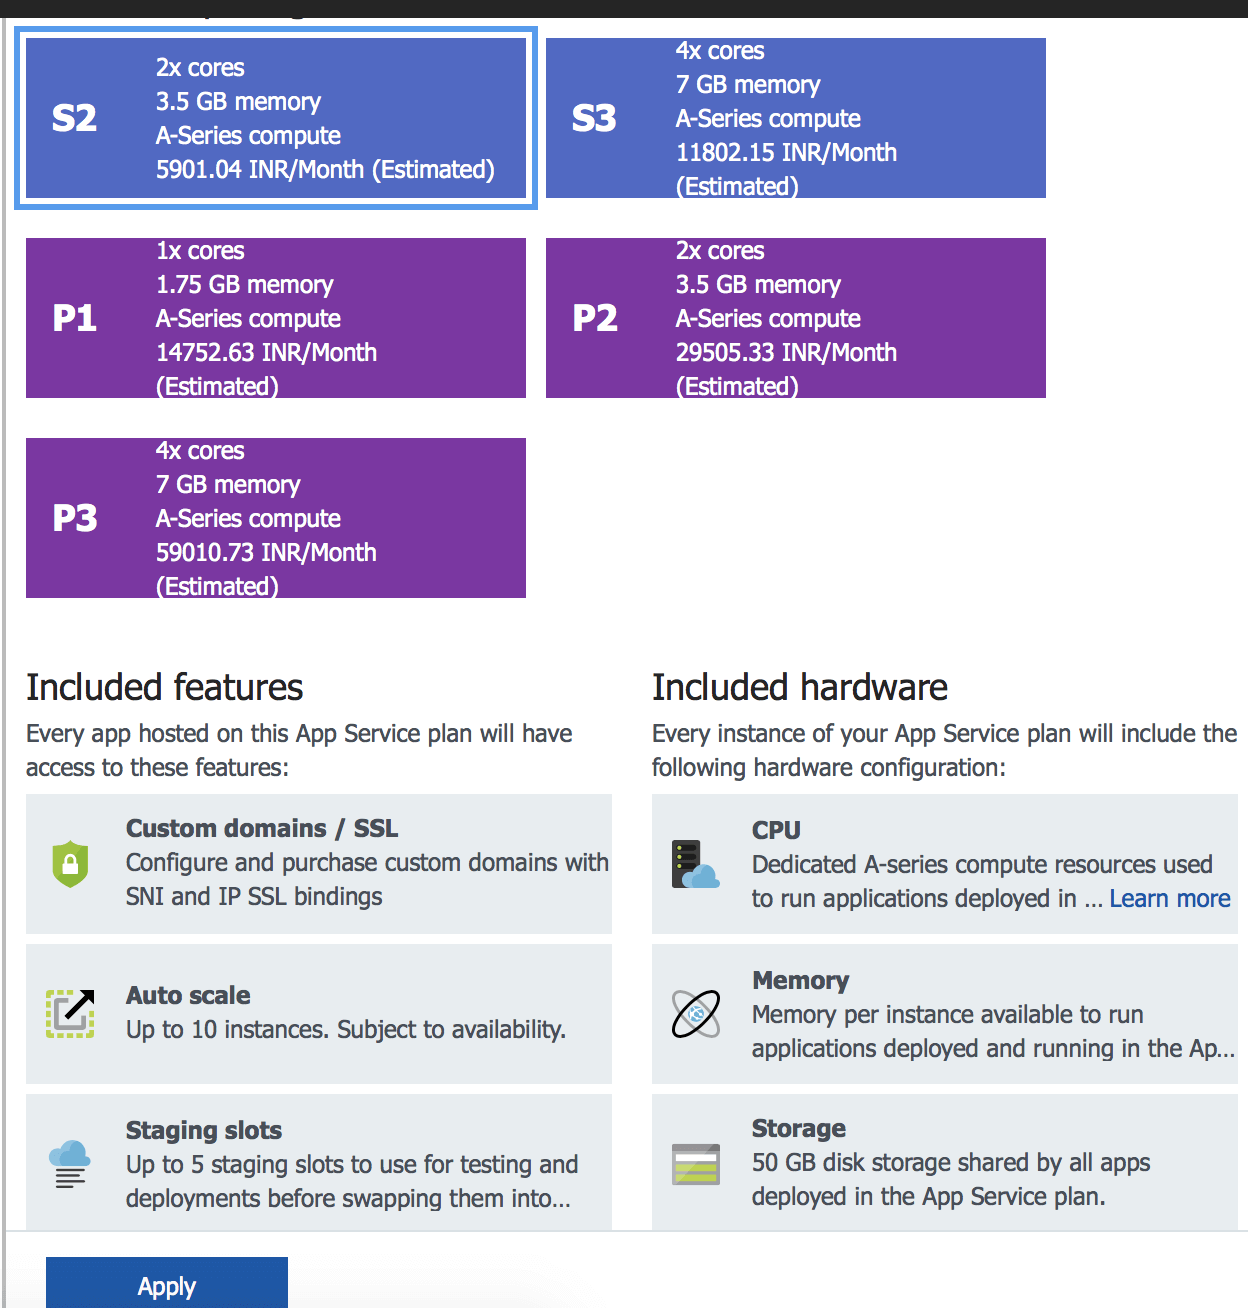
Change the size of an instance
This is the Scale Up option that we discussed briefly earlier. To increase the size of an instance, select the Web App > Scale Up.
Right now, my App Service Plan has Standard S1. I can select any of the below options and click on Apply.
Configure Traffic Manager
Azure Traffic Manager helps reduce downtime and improve the responsiveness of important applications by routing incoming traffic across multiple deployments in different regions.
The benefits of using Azure Traffic Manager in conjunction with Azure Web Apps is that your apps can now be highly responsive and highly available when they are running across different regions in Azure.
There are four Load Balancing methods available in Azure Traffic Manager:
- Priority: All traffic is directed to a specific endpoint, but a backup endpoint is available.
- Weighted: Distributes traffic among the endpoints either equally or based on the weight that you specify.
- Performance: When you have apps in different geographic locations, use the "closest" app in terms of the lowest network latency.
- Geography: Directs users to apps based on which geographic location their DNS query originates from.
To create a Traffic Manager from the Azure Portal, click on Create Resource and search for Traffic Manager Profile. Once selected, click on Create.
Provide the below details:
- Name: Provide a name for the Traffic manager endpoint and this needs to be unique across the globe.
- Routing Method: In my example, I will be choosing Performance.
- Subscription: Select the subscription where this will be deployed. Note, your traffic manager should be in the same subscription as your endpoints that it will be managing.
- Resource Group: Select a resource group or create a new one.
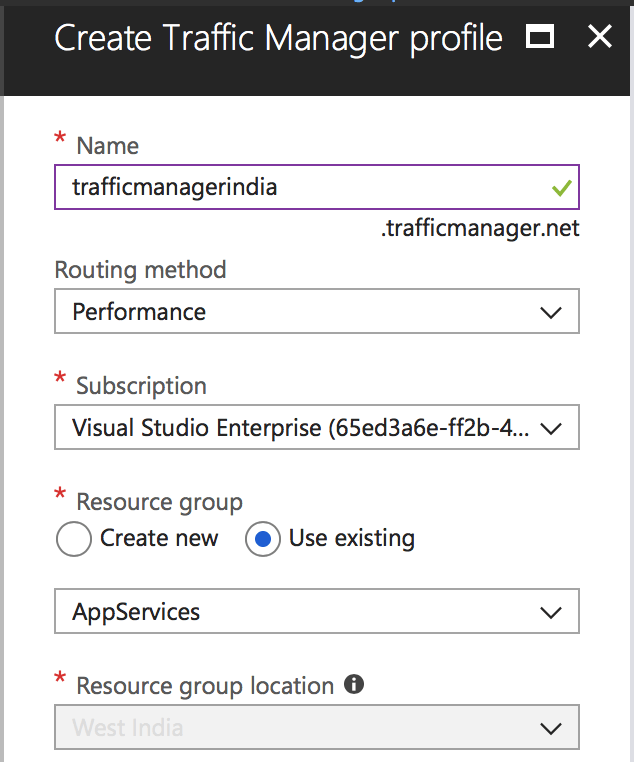
Click Create.
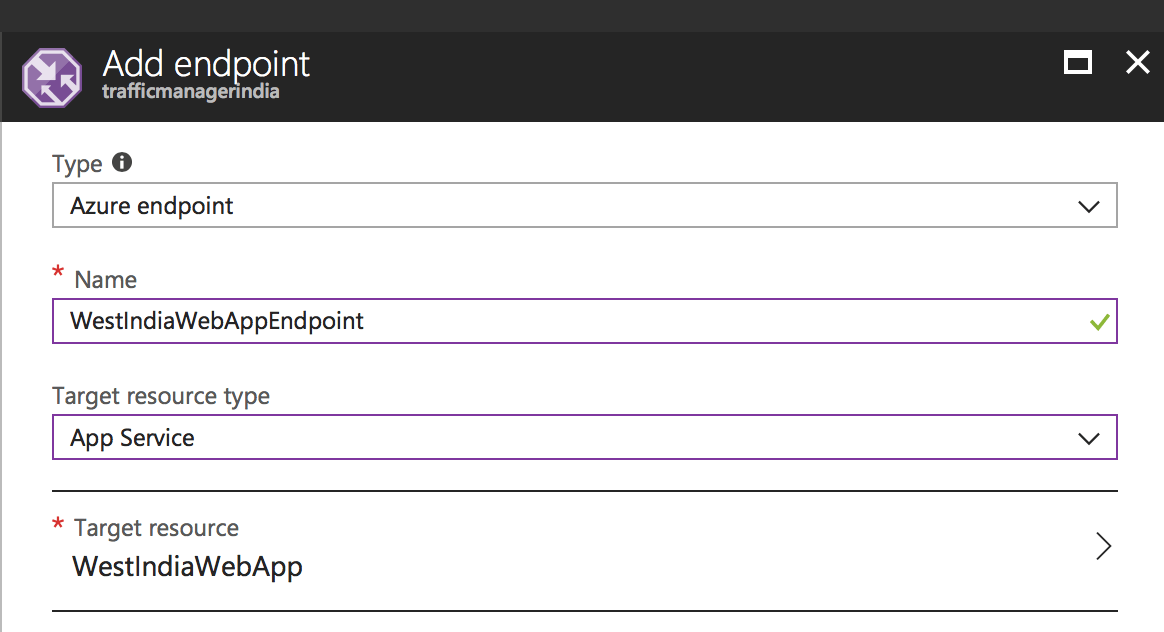
Once the traffic manager is deployed, select the traffic manager and go to Endpoints. Click on Add to add your endpoints.
For this example, I have created two Web Apps, once in the South India Region and the other in West India.
Click on Add to start adding the endpoints and provide them one by one.
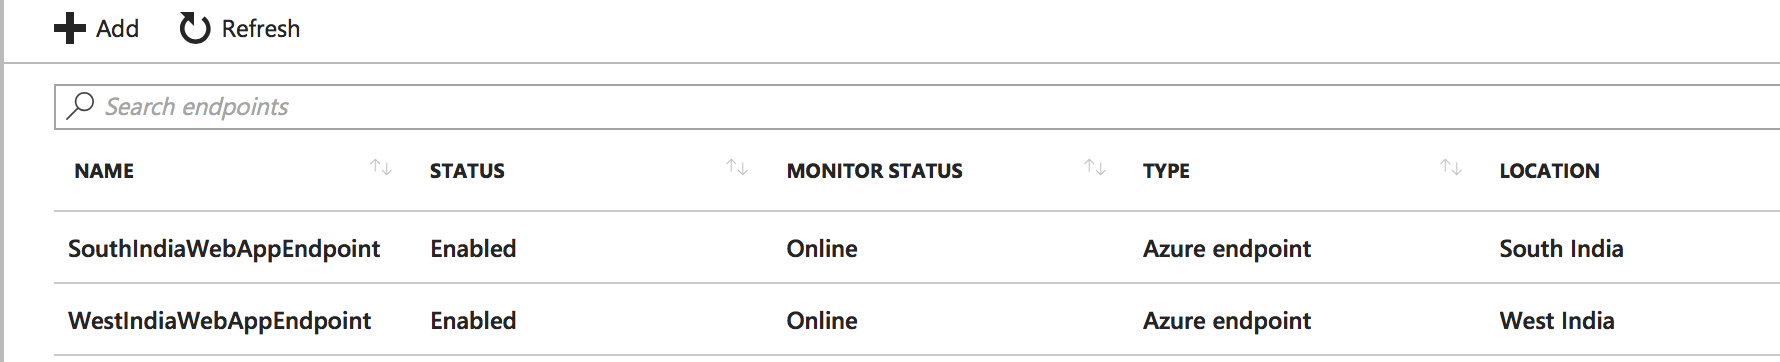
Once both the Web Apps are added, the final screen should like below.
That's it for this post. I hope this has been informative and thank you for reading!


