
Hello Folks, In this post, we will look at a new offering called Azure Dedicated Host which allows you to create Azure VMs on an isolated host for compliance and regulatory reasons.
Microsoft Azure Dedicated Host is an Azure service that provides physical servers - able to host one or more Azure Virtual Machines for Windows and Linux - dedicated to one Azure customer. The server is dedicated to your organization and workloads - capacity isn't shared with other customers.
What are the benefits of using this feature?
The first thing that comes to my mind is the compliance and regulatory reasons that I mentioned before. With this service, Microsoft guarantees that only your VMs will be running on an Azure Dedicated Host and the resources are not shared with any other customer.
The second benefit is that you as a customer have complete control of the Azure Dedicated Host. For example, which VM should reside on which host. You also complete visibility into how performant is the host which was not really the case with shared hosts.
The final benefit is that you can use the Azure Hybrid Benefit along with Azure Dedicated Host offering from Microsoft.
How do I start using Azure Dedicated Host?
So, as of writing this article, this feature is in preview only. The first step is to start using this feature is to create a Host Group. We will be doing these steps using the Azure Portal.
Start typing "Host Group" under Create a resource section and select it.
You will have to fill in the below details:
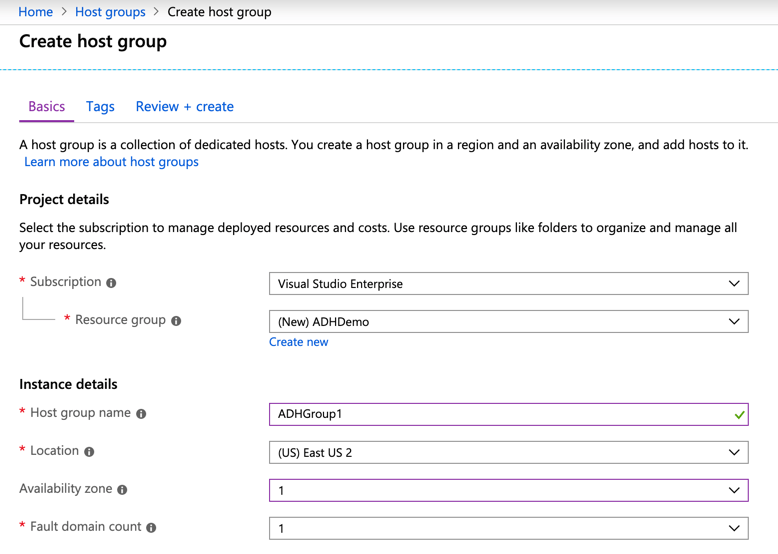
- Subscription: Select the subscription where the Host Group needs to be created.
- Resource Group: Select or Create a new Resource Group.
- Host Group Name: Provide a descriptive name for the Host Group.
- Location: Select the location where the Host Group needs to be deployed.
- Availability Zone: You can optionally select an Availability Zone where the Host Group needs to be created in.
- Fault Domain Count: You can specify up to 3 Fault Domains within a single Host Group.
The next step is to create a dedicated host.
Start typing "Hosts" under Create a resource section and select it.
Provide the below information:
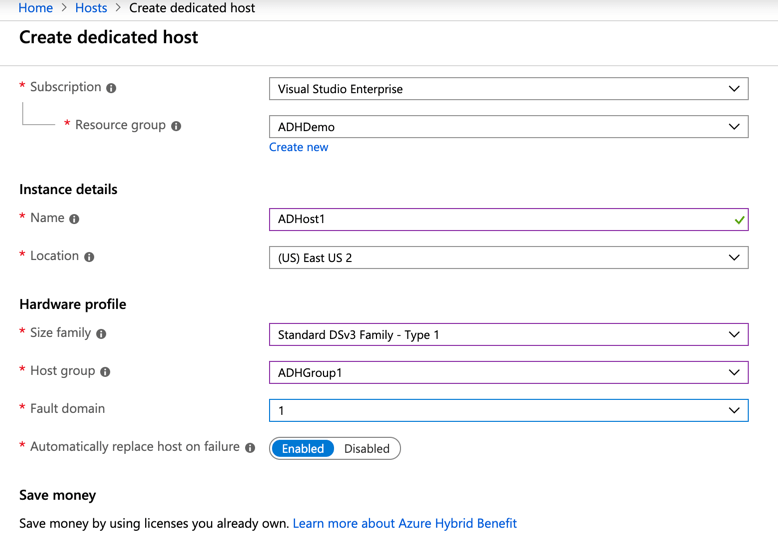
- Subscription: Select the subscription where the Host Group needs to be created.
- Resource Group: Select or Create a new Resource Group.
- Name: Descriptive name for the Host
- Location: Location where the Host should be deployed.
- Size Family:
- Standard DSv3 Family Type 1: It is based on the 2.3 GHz Intel Xeon® E5-2673 v4 (Broadwell) processor. It can have up to 64 vCPUs.
- Standard ESv3 Family Type 1: It is based on the 2.3 GHz Intel Xeon® E5-2673 v4 (Broadwell) processor. It can have up to 64 vCPUs.
- Standard FSv2 Family Type 2: It is based on the Intel Xeon® Platinum 8168 (Skylake) processor. It can have up to 72 vCPUs.
- Host Group: Select the host group that we created in the previous step
- Fault Domain: You will only have 1 FD option since we created the host group using 1 as an option
- Replace Host: Select Enabled if the host should be replaced automatically in case of a failure.
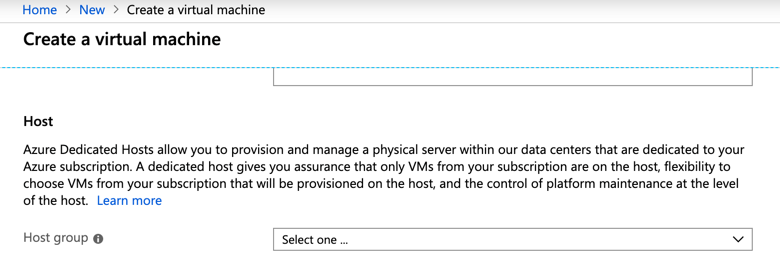
Now, the final step is to create a new VM and add it to this newly created dedicated host.
As part of your VM creation, you should now be selecting the host under the Advanced settings as seen below.
Well, that's all there is to this offering. The only thing to keep in that you cannot fix the different series of VMs on a single dedicated host.
I hope this has been informative and thank you for reading!
Further Reading:


