
Welcome back to the Kubernetes 101 Series and today we will look at how to setup Kubernetes cluster using the kubeadm. kubeadm is a tool built into the Kubernetes distribution used to bootstrap your Kubernetes cluster and used to join nodes to an existing cluster.
In the previous post, we looked at the Kubernetes Cluster Architecture which consists of the Control-plane made up of master nodes and the compute machines made up of worker nodes.
To create our first Kubernetes cluster, I am going to have one master node and two worker nodes. You can follow along this procedure to set up your labs if needed.
I have created three Ubuntu 18.04 VMs running in vCenter Server for this setup. You could create these VMs in your homelab or anywhere that you deem fit.
My VM names are MasterNode01, WorkerNode01 and WorkerNode02.
Below are the prerequisites that you must fulfill before you create your first Kubernetes cluster.
- At least 2 GB or more of RAM and 2 CPU per machine.
- Full network connectivity between all machines in the cluster. All my VMs will be the same subnet with the subnet range being 10.35.36.0/24.
- Unique hostname, MAC address, and product_uuid for every node. VMware should take care of this requirement by default.
- Certain ports are open on your machines. See here for more details.
- Swap space must be disabled. You MUST disable swap in order for the kubelet to work properly. To disable swap, hash out the line about swap from the /etc/fstab file. And run sudo swapoff -a
- Letting IP tables see bridged traffic. To perform this, run the below commands on all the three nodes. Also, on the Linux VMs don't forget to enable IP Forwarding.
cat <<EOF | sudo tee /etc/sysctl.d/k8s.conf
net.bridge.bridge-nf-call-ip6tables = 1
net.bridge.bridge-nf-call-iptables = 1
EOF
sudo sysctl --system
Setup Kubernetes Cluster
Now that we have taken care of the prerequisites, we need to install the Kube components, network plugin called Calico, and the container runtime. In our case, we will use docker as our container runtime.
The three Kube components that we will be installing are:
- kubeadm
- kubectl
- kubelet
I have already explained earlier in this post what kubeadm is. kubectl and kubelet were explained in the previous post which you can find here.
Installing docker
As a first step, let us install docker on the MasterNode01. To install docker, run the below command.
apt-get install docker.io
Once the installation completes, you can check the version of docker by running
docker -v
Installing Kube Components
The next step is to install the kube components by running the below commands. If you are running a different distribution of Linux, the information can be found here.
sudo apt-get update && sudo apt-get install -y apt-transport-https curl
curl -s https://packages.cloud.google.com/apt/doc/apt-key.gpg | sudo apt-key add -
cat <<EOF | sudo tee /etc/apt/sources.list.d/kubernetes.list
deb https://apt.kubernetes.io/ kubernetes-xenial main
EOF
sudo apt-get update
sudo apt-get install -y kubelet kubeadm kubectl
sudo apt-mark hold kubelet kubeadm kubectl
Bootstrap the cluster
Now that we have all the kube components and the container runtime installed, let us bootstrap the cluster using the kubeadm tool.
We use kubeadm init command to bootstrap the cluster and there is only one mandatory flag that needs to be provided which is called "Pod Network CIDR". This is the subnet where all future pods will be deployed.
kubeadm init --pod-network-cidr 192.168.1.0/24
Once bootstrapped, you will have to run the below commands so that non-root users can use the kubectl commands.
mkdir -p $HOME/.kube
sudo cp -i /etc/kubernetes/admin.conf $HOME/.kube/config
sudo chown $(id -u):$(id -g) $HOME/.kube/config
And the above commands will be shown after the successful bootstrap, so don't worry in case you are wondering how I got these.
Installing the Network plugin
There are various network plugins that Kubernetes supports. For the purposes of this series, I will be using Calico. Information about Calico can be found here.
To install the network plugin, we will make use of our newly installed kubectl.
kubectl apply -f https://docs.projectcalico.org/manifests/calico.yaml
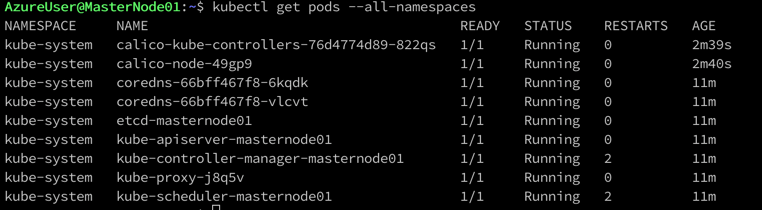
This command will install a bunch of objects which is something we can discuss later. You can make sure that the installation has completed if the below command shows you that all pods are running.
kubectl get pods --all-namespaces
Don't sweat too much for now if you don't understand the output. We will discuss pods and namespaces all of the various Kubernetes objects in future blog posts.
Add Worker Nodes to the Kubernetes Cluster
Finally, we are at the stage where we can add the Kubernetes worker nodes to the cluster. Before you can add the nodes, make sure that you have installed the kube components and the container runtime as we did on the master node.
The kubeadm join command syntax is as below:
kubeadm join --token <token> <control-plane-host>:<control-plane-port> --discovery-token-ca-cert-hash sha256:<hash>
The above was shown when the cluster was bootstrapped. In case, you missed, to find the token and the hash, you can the below commands.
kubeadm token list
openssl x509 -pubkey -in /etc/kubernetes/pki/ca.crt | openssl rsa -pubin -outform der 2>/dev/null | openssl dgst -sha256 -hex | sed 's/^.* //'
Once the worker nodes are successfully joined to the cluster. You can run the below command to check the status of the nodes in your Kubernetes cluster.
kubectl get nodes
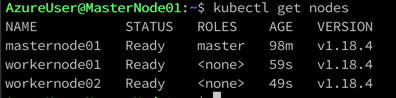
Well, that's it! We now have a fully functional three-node Kubernetes cluster running one master node in the control plane and two worker nodes.
In the next post, we will look at what Pods are and how you can create them on the newly built Kubernetes cluster.
I hope this was informative and thank you for reading!


