
In the previous post, we looked at Kubernetes ReplicaSets which allowed us to maintain a desired number of pods. In this post, let us look at Kubernetes Deployments which use ReplicaSets behind the scenes and allows us to perform controlled updates and rollbacks to the pods if needed.
Kubernetes Deployments are a wrapper around Kubernetes ReplicaSets that help us solve some of the shortcomings of the ReplicaSets.
For example, if an image used by a container in a pod is changed within a ReplicaSet, the ReplicaSet does not rollout the updated image automatically. As an admin or Kubernetes user, the expectation is that you need to delete the associated pods, and when the ReplicaSet creates the next pod to keep up with the desired state, it will use the new image for the container.
With Kubernetes Deployments, you can perform the change, and depending on the strategy used for the Deployments used, the cluster will instruct the deployment to recreate all pods at once or in a controlled fashion. If this confusing, then wait, we will discuss the different strategies at some time.
Let us first look at the yaml definition file for a Kubernetes Deployment.
apiVersion: apps/v1
kind: Deployment
metadata:
  name: first-deployment
  labels:
    app: first-deployment
spec:
  replicas: 5
  selector:
    matchLabels:
      app: first-deployment
  template:
    metadata:
      labels:
        app: first-deployment
    spec:
      containers:
        - name: first-deployment-container
          image: busybox
          command: ['sh', '-c', 'echo Hello from my container! && sleep 3600']
If you were to compare the ReplicaSet definition file from the previous post and the above file, almost everything looks the same except the kind field.
Again, let us create the deployment using the kubectl create command.
kubectl create -f deployment-definition.yaml --record=true
Once the command succeeds, let us take a look at the various resources that the cluster created.
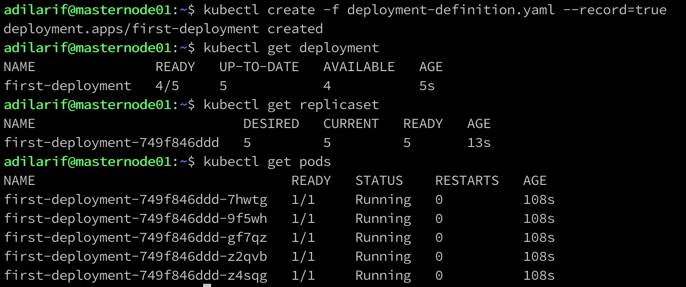
The cluster created a deployment, a replicaset, and the 5 pods as per the replicas value defined in the yaml file.
Also notice, that we have used the --record flag and set it to true. This allows us to track the changes we make to the deployment using the imperative way.
If you closely look at the yaml file, the image name that we have provided is just "busybox". This will download the latest image from the docker hub.
Let us say that I want to specify a specific version of busybox image now and want to roll this out to the deployment. We can do this using the below command.
kubectl set image deployment first-deployment first-deployment-container=busybox:1.31.1 --record
The syntax is pretty straight forward.
kubectl set image deployment <name of the deployment> <name of the container=imagename> --record
This will go out and recreated the pods using the new immediately in a controlled fashion.
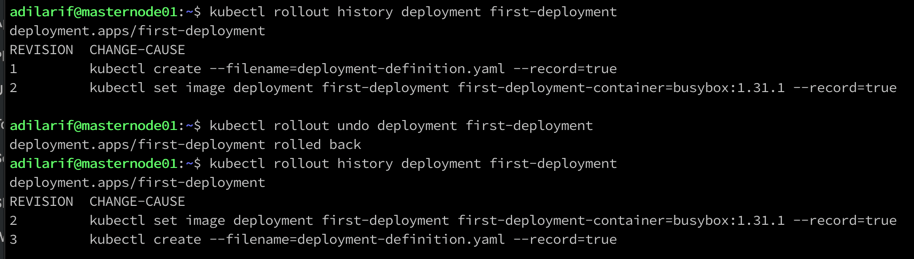
To check the rollout history, type the command:
kubectl rollout history deployment first-deployment
To rollback, if needed, use the below command.
kubectl rollout undo deployment first-deployment
You can check the events of this rollout using the below command.
kubectl describe deployment first-deployment
Check the current image used to deploy the pods.
Scaling Up/Down the Kubernetes Deployments
We can scale up or down the Kubernetes Deployments on the fly using the below command.
kubectl scale deployment first-deployment --replicas=3
And we can use the same to increase the number of replicas on the fly.
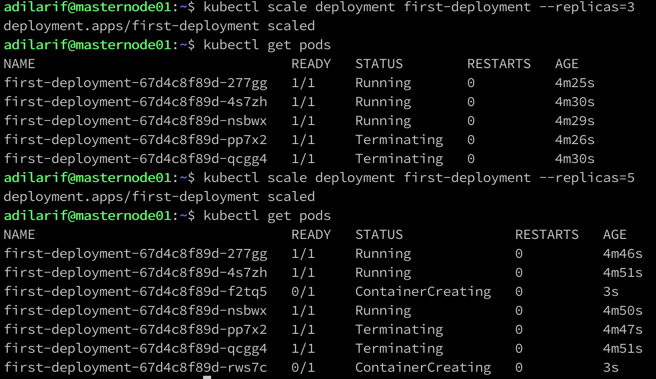
In the above screenshot, it can be seen two pods were being terminated as soon as we scaled down the replicas and two more being created as soon as we increased the replica count.
Kubernetes Deployment Strategies
There are two strategies that are available for a Kubernetes deployment and are called "Recreate" and "RollingUpdate". RollingUpdate is the default strategy.
Recreate Strategy
This strategy will first terminate all the pods and then create new pods based on the replicas value based on the changes made to the deployment.
As you can see, this is not the recommended strategy for a production deployment as it can have a downtime of apps. Hence, this is not the default strategy.
The yaml file for this type of strategy will look like below:
apiVersion: apps/v1
kind: Deployment
metadata:
  name: first-deployment
  labels:
    app: first-deployment
spec:
  replicas: 3
  strategy:
    type: Recreate
  selector:
    matchLabels:
      app: first-deployment
  template:
    metadata:
      labels:
        app: first-deployment
    spec:
      containers:
        - name: first-deployment-container
          image: busybox
          command: ['sh', '-c', 'echo Hello from my container! && sleep 3600']
RollingUpdate Strategy
The Deployment updates the pods in a rolling update fashion and makes sure that there is no downtime for the apps running within the pods.
There are two additional optional fields available within this strategy and are:
- maxUnavailable: Using this field, we can specify how many pods or percentage of pods can be brought down at a given point in time. For example, If we have 4 replicas and the value is set to 25% which is the default, then one container will be terminated as soon as the update starts.
- maxSurge: Using this field, we can define the number of pods that can be created over the desired number. For example, If we have 4 replicas and the value is set to 25% which is the default, then one container will be created as soon as the update starts.
For both options, we can provide absolute numbers as well.
The yaml for the RollingUpdate strategy using the optional fields will look like:
apiVersion: apps/v1
kind: Deployment
metadata:
  name: first-deployment
  labels:
    app: first-deployment
spec:
  replicas: 5
  strategy:
     type: RollingUpdate
     rollingUpdate:
        maxUnavailable: 20%
        maxSurge: 20%
  selector:
    matchLabels:
      app: first-deployment
  template:
    metadata:
      labels:
        app: first-deployment
    spec:
      containers:
        - name: first-deployment-container
          image: busybox
          command: ['sh', '-c', 'echo Hello from my container! && sleep 3600']
As explained, you can use the describe command to see how the pods were terminated and created when testing the different strategies.
In the next post, let us discuss namespaces.
I hope this has been informative and thank you for reading!


