
In the previous post, we looked at how to create a pod and how the pod lifecycle works. In the real world, you won't be really creating pods on their own that's not going to be great for automation. This is why we are looking at this post called Kubernetes ReplicaSets Explained.
The primary job of a ReplicaSet is to maintain a set number of pod copies or replicas. The ReplicaSet controller guarantees that a specified number of identical pods will be running at all times. The yaml file will define the number of replicas that the ReplicaSet should maintain.
Well, why should you use Kubernetes ReplicaSets? As explained above, it maintains a set number of pods and if your application has to scale up or down, this is the best way to maintain the number of desired pods.
Now, let us look at an example of the yaml file which we will use to create the ReplicaSet.
apiVersion: apps/v1
kind: ReplicaSet
metadata:
  name: first-replicaset
  labels:
    app: first-replicaset
spec:
  replicas: 5
  selector:
    matchLabels:
      app: first-replicaset
  template:
    metadata:
      labels:
        app: first-replicaset
    spec:
      containers:
        - name: first-replicaset-container
          image: busybox
          command: ['sh', '-c', 'echo Testing Replicaset! && sleep 3600']
We've already discussed the 4 important fields in a yaml file and they are apiVersion, kind, metadata, and spec. And we also understand that spec is where we define the desired states for various Kubernetes objects.
The ReplicaSet uses the selector object and matchLabel to check for any new pods that it might own. If there's a new pod that matches the selector labels the ReplicaSet and it doesn't have an owner reference or the owner is not a controller (even the manually created pods), the ReplicaSet will take it over and start controlling it.
So, let us go ahead and create the first ReplicaSet using the below command:
kubectl create -f replicaset-definition.yaml
![]()
Once the Kubernetes ReplicaSet is created, you can use the below commands to check if it is working properly or not.
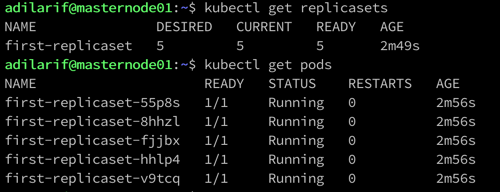
kubectl get replicasets
kubectl get pods
The first command has an output which shows that the 5 desired pods are running as defined in the yaml file for the value replicas.
And the next command shows the output for the running pods. Look at the naming convention for pods, it follows the name of the replicaset and then a semi-random string.
Next up, I am going to delete one of the pods using the below command.
kubectl delete pod first-replicaset-55p8s
Let me look at the number of pods again. I still have 5 pods!! This was because the replicaset controller saw that one pod was missing and it created it immediately. Look at the AGE column to see that the pod was created recently.

Let us use the same yaml that we used in our previous post, but only change the metadata field, app to match the replicaset selector.
apiVersion: v1
kind: Pod
metadata:
  labels:
    app: first-replicaset
  name: first-pod
spec:
  containers:
  - image: nginx
    name: nginx
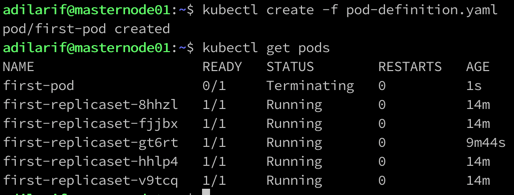
Use the below command to create the pod.
kubectl create -f pod-definition.yaml
And almost immediately, the pod is terminated by the replicaset because it matches the selector and there are already 5 pods in running state.
And if you now delete the replicaset using the below command, it will also delete the associated pods with it.
kubectl delete replicaset first-replicaset
In some cases, you may not want to delete the pods and let it run for some more time and would want to delete the replicaset first, you can run the below command.
kubectl delete replicaset first-replicaset --cascade=false
Well, that's all I wanted to share in this post and in the next post we will discuss about Deployments which will help us in some of the shortcomings of Kubernetes ReplicaSets.
I hope this has been informative and thank you for reading!


