
In this post, we will discuss Kubernetes Namespaces. Kubernetes Namespaces are used to create multiple virtual clusters within a single physical Kubernetes cluster.
If you have not been following the Kubernetes 101 Series, feel free to look at the previous blog posts about the introduction, Kubernetes Cluster Architecture, Kubernetes Cluster setup, Pods, and Pod Lifecycle, ReplicaSets, and Deployments.
Kubernetes Namespaces allow us to create a logical separation of the physical cluster based on the needs of the organization. For example, you can choose to create the namespaces called Dev, UAT, Production, etc or create namespaces based on the name of the teams working on the cluster. The possibilities are endless.
When the cluster setup is performed, Kubernetes creates a few namespaces. To view the namespaces, type below.
kubectl get namespaces
- default: This is the default namespace for objects when no other namespace is provided.
- kube-system: This namespace is used for objects created by the Kubernetes system. It has information related to the management of the cluster and should usually be left alone.
- kube-public: The public namespace is available to everyone with access to the Kubernetes cluster (including those not authenticated).
- kube-node-lease: This namespace for the lease objects associated with each node which improves the performance of the node heartbeats as the cluster scales and again should be left alone.
All of the operations that we have performed up until now were happening within the default namespace.
So, let us create our first namespace using the below yaml file.
apiVersion: v1
kind: Namespace
metadata:
  name: production
  labels:
    name: production
To create the namespace, type the below command.
kubectl create -f namespace-definition.yaml
![]()
Next up, let us create a new pod in the production namespace. We can reuse pod-definition.yaml file we used in the Pods and Pod Lifecycle post.
apiVersion: v1
kind: Pod
metadata:
  labels:
    app: first-production-pod
  name: first-production-pod
  namespace: production
spec:
  containers:
  - image: nginx
    name: nginx
Note that the only difference we have is that we have now added the namespace field under the metadata section.
Let us create this pod using the below command.
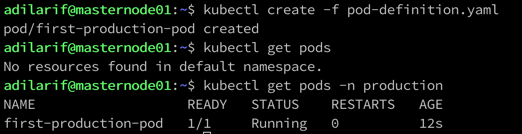
kubectl create -f pod-definition.yaml
Let us check if the pod exists now using the command.
kubectl get pods
No, it does not. The reason being the kubectl get pods command is looking for pods in the default namespace.
We should run the below command to get the pods in the production namespace.
kubectl get pods -n production
We can also run the below command to list all pods under all namespaces.
kubectl get pods --all-namespaces
So, in this post, we saw how to logically separate our Kubernetes cluster into multiple small virtual clusters using namespaces for ease of use and applying RBAC if needed.
I hope this has been informative and thank you for reading!


