
Today, we will be looking at the Exam 70-410 Objective 4.2 - Deploy and Configure DHCP Services.
The Dynamic Host Configuration Protocol (DHCP) is a standardized network protocol used on Internet Protocol (IP) networks for dynamically distributing network configuration parameters, such as IP addresses for interfaces and services.
With DHCP, computers request IP addresses and networking parameters automatically from a DHCP server, reducing the need for a network administrator or a user to configure these settings manually.
This objective covers how to:
- Create and configure scopes.
- Configure a DHCP reservation.
- Configure DHCP options.
- Configure Client and Server for PXE Boot.
- Configure DHCP Relay Agent.
- Authorize DHCP Servers.
Before we continue let us first understand how the DHCP process works.
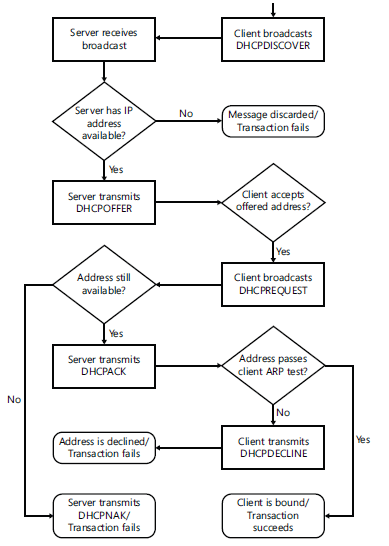
When the client first boots up, and is configured to receive the network settings from the DHCP Server, it sends out a DHCPDiscover broadcast.
The server then receives the broadcast, and if an IP address is available, it transmits DHCPOffer message to the client.
If the client accepts the offer message, it sends out an another message in the form of DHCPRequest, asking to lease the IP address and related settings.
If the IP Address is still available with the server, it responds with a DHCPAcknowledge request and assigns the IP Address to the client.
You can see the process overview in the below diagram.
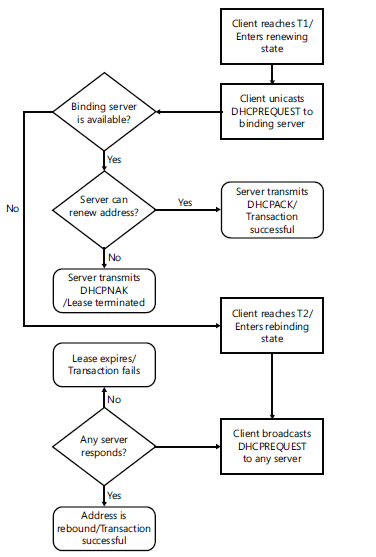
Once the client receives the IP Address from the server, it can keep the same IP Address with itself for a default period of 8 days.
This period is called the Lease period.
The client will then attempt to contact the server at the 50% of the lease time (4 days) to renew the lease.
If, for some reason, the DHCP server is unavailable to process the request, the client will then again attempt to contact the server after 50% of the new value (2 days) to renew the lease.
The below diagram explains the process.
Now that we are clear on the process of DHCP works, let us move on to our objectives.
Create and Configure Scopes
At first, we need to install the DHCP Role of the Windows Server 2012 R2 so that we can take care of the objectives specified for this article.
There are various ways that you can install the Role.
The first way is to install using the very old DISM utility.
DISM /online /enable-feature /feature-name:DHCPServer
You can also install the role using Powershell, which is my preferred method.
Install-WindowsFeature DHCP -IncludeManagementTools
You will notice that we are providing the parameter -IncludeManagementTools, which will install the necessary tools to administer the DHCP Server.
The third and the final method to install is from the Server Manager.
From Server Manager, click on Add Roles and features, select DHCP. Go through the wizard and complete the post-installation checks.
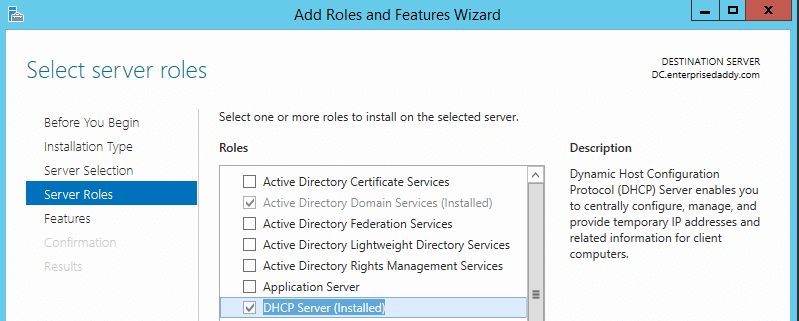
In my case, I have already installed the role, that is why you see the option grayed out.
Once you perform all the steps, be sure to check the service is up and running.
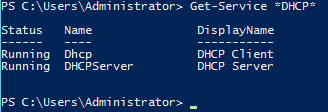
You can see that the service is running fine.
DHCP Scopes
A scope is a range of IP Addresses on a particular subnet that are selected for allocation by a DHCP Server.
To create a scope, you will have open the DHCP snap-in.
To do so, open Server Manager, click on Tools > DHCP.
Click on the server, expand to IPv4 and click on New scope.
A new wizard comes up, wherein you will have to provide the details. Provide a name for the scope, start IP Address and End IP Address along with the subnet mask and default gateway.
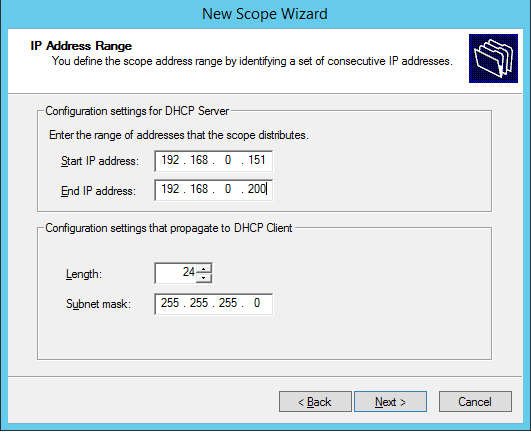
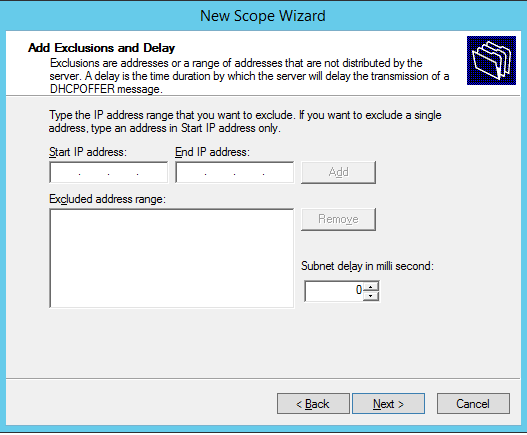
Provide an exclusion range if you do not want to assign any IP Addresses from the DHCP Server.
You will also need to provide the lease provide, which is 8 days by default. And click on Finish.
You can create a new scope from PowerShell as well.
Add-DHCPServerv4Scope -StartRange 192.168.0.151 -EndRange 192.168.0.200 -SubnetMask 255.255.255.0 -Name Test
Configure a DHCP Reservation
Although most of the time, you would require using DHCP for most computers on the network. But for few mission critical servers, you would require a static IP Address.
Eg: DHCP Server itself needs a static IP Address.
However, it is possible to assign a static IP Address from DHCP, using manual, instead of dynamic allocation.
In a Windows DHCP Server, a manually allocated IP Address is called reservation.
Note: You would need the MAC Address of the client computer to configure reservation.
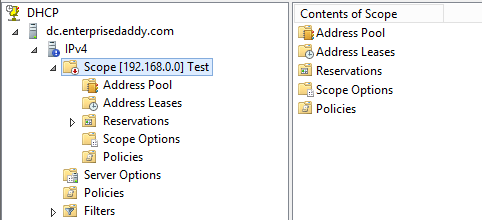
To add a reservation, select a scope, Right click on Reservation > New Reservation
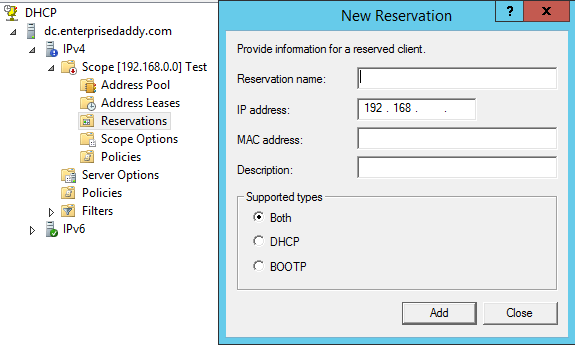
Provide a name for the reservation and the MAC Address of the client and click on Add.
Configure DHCP Options
The New scope wizard allows you to configure a few of the most commonly used DHCP options as you create a new scope, but you can always configure the others as per the requirement.
The Windows DHCP Server supports two kinds of options:
- Scope Options: Options supplied only to DHCP clients receiving addresses from a particular scope.
- Server Options: Options supplied to all DHCP clients receiving addresses from the server.
The Router option is a typical example of a scope option because a DHCP client’s default gateway address must be on the same subnet as its IP address.
The DNS Servers option is typically a server option because DNS servers do not have to be on the same subnet, and networks often use the same DNS servers for all their clients.
Below is an example of the Scope options, for simplicity purpose I have added the DNS Domain Name to scope options itself. Ideally you would add that to Server options.

Configure Client and Server for PXE Boot
In most cases, you would have OS installed on the client computer using DHCP services.
However, it is also possible for a bare metal computer, that is, a computer with OS installed to use DHCP.
The PreBoot Execution Environment (PXE) is a feature built into many network adapters that enable them to connect to a DHCP Server to obtain TCP/IP client settings.
Typically used to automate the OS deployment process in large environments.
In addition to IP Address, TCP/IP Settings, the DHCP Server can supply the client computer with an option specifying the location of a boot file that the system can download and initiate the Windows OS installation.
A PXE-equipped system downloads boot files using TFTP, a simplified version of FTP protocol that requires no authentication.
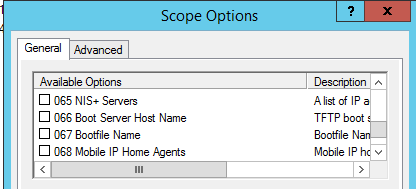
To configure these settings, go to scope options and select the below.
- No 66: Provide the Windows Deployment Server IP Address.
- No 67: Boot File Name (.wim file)
Configure DHCP Relay Agent
Since the clients rely on broadcast transmissions, they can access only the DHCP Servers present locally on the network.
However, it is possible to create a DHCP infrastructure in which one server provides addresses for multiple subnets.
To do this, you must install a DHCP Relay agent on every subnet that does not have a DHCP server on it.
To enable, First install the Remote Access Role on the machine that is on a different subnet, select Routing while installing the Role.
Now click on Tools from Server Manager and select Remote Access.
Go through the initial configuration, select VPN Server for testing purposes.
Once done, Routing and Remote Access will open. Right click on DHCP Relay Agent and provide the DHCP Server Address.

Authorize DHCP Server
For a DHCP Server to be authorized in an AD environment, you must be logged on as a member of Enterprise Admin group.
This procedure is usually required if you are running a DHCP server on a member server.
If you are installing a DHCP Server on a computer also running as a DC, the server is automatically authorized the first time you add server to the DHCP console.


1 Comment
Hello sir , what is objective of dhcp relay agent ? Please explain me.