
vmkfstools is a vSphere CLI tool available on every ESXi host and can be used to perform various activities against the VMFS volumes and virtual disks.
The idea behind the article was to provide various options available when using vmkfstools with Virtual Disks.
In my day-to-day job, I end up using most of these examples under various circumstances and sometimes I have the need to refer to the documentation.
So, I thought of writing this for my own documentation and also share it with the community for better consumption.
Today, we will be only looking at how to use vmkfstools with Virtual Disks. In the upcoming articles, we will look at some of the other use cases of vmkstools.
vmkfstools Virtual Disk options
Every command in the vSphere CLI has some amazing help written for seeing what options are available when using the command.
So let us run the command with the help parameter to see the Virtual Disks options available for us.
vmkfstools --help
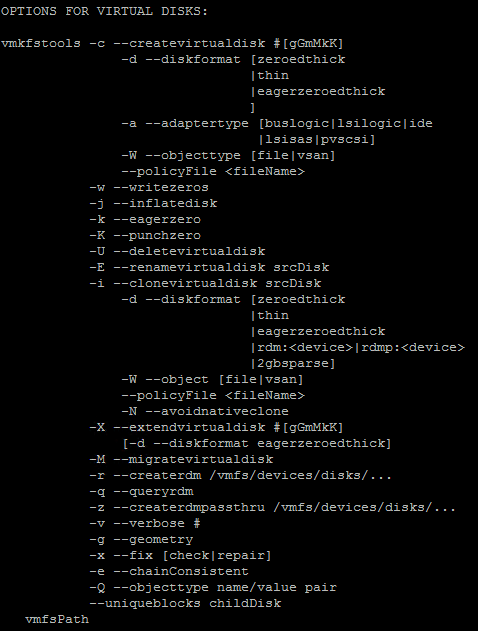
Creating a Virtual Disk
Now let us go ahead and create a TestVMDk file by using the below command.
vmkfstools -c 1024m TestVMDK.vmdk
![]()
By default, this will create a thick provisioned disk. You would now see that there are two disks created.
One would be the flat file and the other one would be the descriptor file.
![]()
If you would like to create a thin provisioned disk, then you could pass the -d parameter along with the above command.
vmkfstools -c 1024m -d thin TestVMDK1.vmdk
This will create a 0 bytes file and will grow as and when data is added to the flat file.
![]()
Inflating a Virtual Disk
This option converts a thin virtual disk to eager zeroed thick, preserving all existing data. The option allocates and zeroes out any blocks that are not already allocated.
vmkfstools -j TestVMDK1.vmdk
You could also use --inflatedisk instead of -j parameter.
![]()
The used space of the Virtual Disk is now 1 GB.
![]()
Extending a Virtual Disk
vmkfstools can be used to extend the size of the Virtual Disk similar to how extending the size using the thick client or Web Client by going to Edit Settings of the Virtual Machine.
Let us extend the TestVMDK1.vmdk by another extra 1 GB.
The parameter used to extend the Virtual Disk is -X
vmkfstools -X 2G TestVMDK1.vmdk

Deleting a Virtual Disk
vmkfstools also allows us to delete the Virtual Disk as well. The option that is used to delete the Virtual disk is -U or --deletevirtualdisk
vmkfstools -U TestVMDK1.vmdk
Alternately you could also use rm command as in any other Unix based OS, but you would have to delete both the flat file and the descriptor files separately.
Cloning a Virtual Disk
Cloning performs a copy of the existing Virtual disk.
The parameter that is used to clone the Virtual is -i or --clonevirtualdisk. You could also specify the file provisioning type when you clone the virtual disk.
vmkfstools -i TestVMDK.vmdk -d thin TestVMDKcloned.vmdk

Rename a Virtual Disk
Lastly, we will look at renaming the Virtual Disk.
It is a recommended practice to rename the Virtual Disk using vmkfstools and not to use mv command.
The option used to rename the Virtual disk is -E or --renamevirtualdisk
vmkfstools -E TestVMDKcloned.vmdk TestVMDK1.vmdk
Checking and Repairing Virtual Disks
If there is an unclean shutdown of the Virtual Machine and you suspect the integrity of the Virtual Disk, use -x along with the check option.
vmkfstools -x check TestVMDK1.vmdk
![]()
In case there are any errors, you could also repair by using the below command.
vmkfstools -x repair TestVMDK1.vmdk
That is all we have for today. I hope you found this article interesting, kindly feel free to share this on social media if you feel this is going to help other folks.
Thank you for reading!


1 Comment
I’m using vSphere/vCLI 6.5. Authenticating to the vCenter server and nominating a VI host, i.e.
vmkfstools –server … –vihost …
I found I had to specify the virtual disk path in its URL form:
https://{server}/folder/{path}.vmdk?dcPath={datacenter}&dsName={datastore}
and NOT the [datastore] path.vmdk form as per the documented examples. I guess that’s because the vCenter server requires a datacenter specification that the vmkfstools CLI doesn’t support and so can only be passed through the URL.
Anyway I could – eventually – create, extend and delete a virtual disk through that interface but I now see that the VI Web Client doesn’t report disks created this way. The 6.5 client doesn’t seem to offer any sort of refresh function. Any ideas ?