
Hi All,
Welcome back to the series, How to setup VMware vSphere Lab in VMware Workstation.
This is the sixth part of the guide, where we will be installing the vCenter in our VMWare vSphere Lab. In the previous article, we finished installing ESXi hosts.
As a recap, in the first part we dealt with the prerequisites and in the second, we designed the network using Virtual Network Editor. In the third, we created a template to install the necessary VM's and in the fourth part, we installed a Domain Controller using the same template.
The vCenter Server installation process is now much simpler compared to previous versions:
- Web Client, SSO, Inventory Service, Auto Deploy and ESXi Dump Collector are now rolled into the single, embedded Platform Services Controller (PSC) with vCenter Server.
- Design decision – PSC and vCenter server need to decide if your deployment will be embedded or separate (this post assumes embedded).
- The default database is now vPostgres for vCenter.
Prerequisites
- Ensure that the Windows Server VM has 8GB of RAM allocated.
- Ensure that the Windows Server C Drive has 17GB of space free (the common application data directory requires at 11GB if you are installing to a separate application drive).
- Ensure that the System Name is an FQDN and that the Server IP Address is static (if you use DHCP, make sure the IP Address is reserved).
We will clone from our original template the make the changes as per the prerequisites.
We will provide an IP address of 10.10.2.3/24.
This VM will be joined to the Active Directory enterprisedaddy.com as Member Server.
Install the vCenter Server
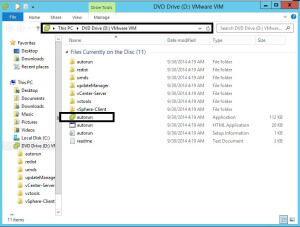
- Mount or extract the VIM 6.0 ISO image to the Microsoft Windows Server 2012 R2 system.
- Execute the “autorun.exe” file.
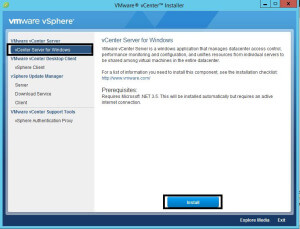
- In the “VMware vCenter Installer” window, select the “vCenter Server for Windows” object under the “VMware vCenter Server” option. Press the “Install” button.
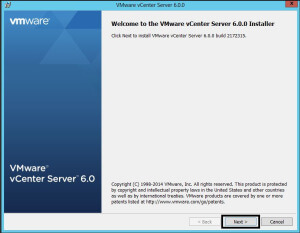
- In the “VMware vCenter Server 6.0.0″ window, press “Next”.
- Accept the license agreement and select “Next”.
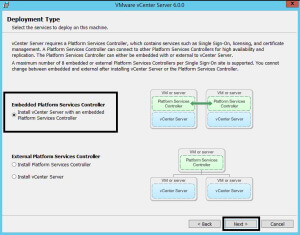
- Select the “Embedded Platform Services Controller” “Deployment Type” and press “Next”.
- Verify the “System Name” is a valid FQDN and press “Next”.
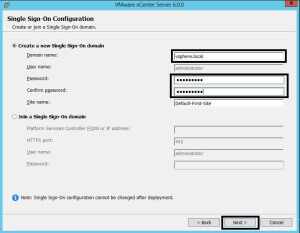
- In the “Single Sign-On Configuration” window, select “Create a new Single Sign-On domain” and enter the “Domain Name”, “Password” and “Site Name”. Then press “Next”.
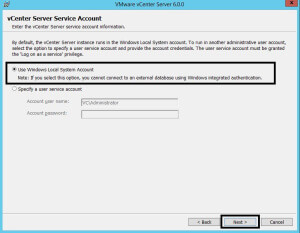
- In the “vCenter Service Account” window, select “Use Windows Local System Account” and press “Next”.
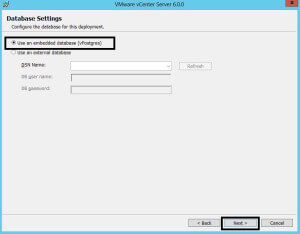
- In the “Database Settings” window, select “Use an embedded database (vPostgres)” and press “Next”.
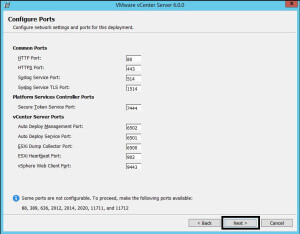
- In the “Configure Ports” window, verify the default ports and press “Next”.
- In the “Destination Folder” window, change the destination folder if necessary and select “Next”. vCenter Server can only be installed to a location where the directory names consist of alphanumeric characters and spaces. Make sure the volumes support short names, otherwise “spaces” in the folder names will not be supported.
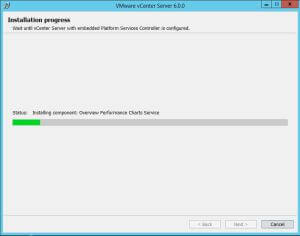
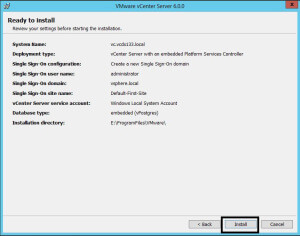
- In the “Ready to install” window, verify the settings and then press “Install”.
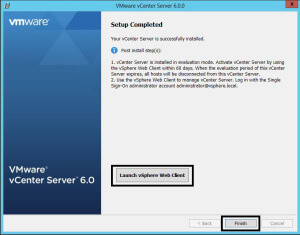
- In the “Setup Completed” window, press the “Launch vSphere Web Client” button and then select “Finish”.
- Open the Services application and verify that the VMware “VirtualCenter Server” service and associated other services are installed and running.
- Enter the Administrator credentials defined earlier and press “Login”. Note that you may have changed the default “[email protected]” to something different. If you want to use “Windows session authentication”, you must install the “Client Integration Plugin” (link at bottom left of screen).
- The vSphere Web Client will open to the “Home” screen.
Once you launch the vSphere Web Client and log in, we will then create the Datacenter.
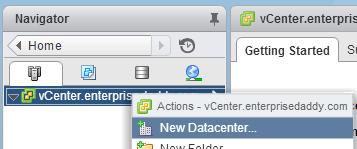
Once you launch the vSphere Web Client and log in, we will then create the Datacenter.
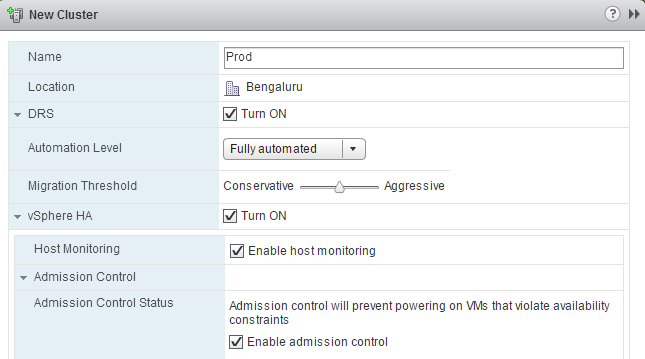
Then create a new cluster below the Datacenter.
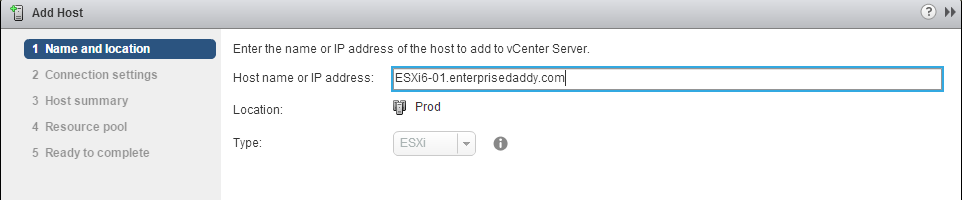
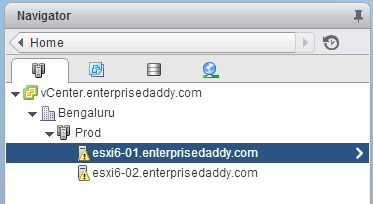
Next up, we will add out two ESXi hosts to the newly created Prod cluster.
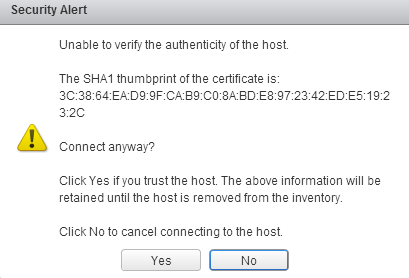
Then accept the certificate warning.
Assign the evaluation license in the next step, also disable the lockdown mode in the next prompt. We will discuss this in length in the future articles.

Do the same for the other ESXi host as well.
Make sure that both the hosts are reachable over the network using both the FQDN and the IP Addresses.
If you experiencing problems here make sure that you have both forward and reverse zones properly created on your DNS server and in both zones you got the records populated as well. If not, create those records.
That's it. We will now move on to create the shared storage in the next post.
This is the sixth part of the VMWare vSphere Lab using VMWare Workstation. Links to the rest of the articles can be found below.
- What do you need to build VMWare vSphere Lab?
- The network design of VMWare vSphere lab in VMware Workstation.
- Preparing Windows Templates for VMWare vSphere Lab
- How to create the Domain Controller Virtual Machine
- Installing of Nested ESXi hosts in our VMware vSphere Lab
- Installing the vCenter Virtual Machine for VMWare vSphere Lab
- Designing the Shared Storage for VMWare vSphere Lab


10 Comments
Great write up Adil and thank you.
Knowing VMware is fazing out vCenter using the .iso, more and more tech are deploying vCenter VCSA using the .OVA it has been such a issue installing on Workstation and not only me but many. Can you write up a how to guide.
I’m currently CCIE but I’m really wanting to know more about virtualization.
Thanks and keep it up.
Hi Daniel,
Thank you for stopping by. Glad you liked the content.
I’ll try and add this write up to my schedule.
Cheers.
Again, this was fantastic. Only thing missing here is that for the web interface to work in windows 2012 you have to add the user desktop experience in the features for flash support.
Other than that…thanks a lot for a very well written tut!
Hello Yan,
I am glad you found it useful.
I am very new to VMware so please excuse the uneducated question. What are we installing on the 2 ESXi VMs?
Adil,
Thanks for the instructions – very well written, and easy to follow.
Question – I prefer using the appliance version of vCenter.
Any reason why I should?
I meant *shouldn’t.
Appliance is the way forward. This guide was written a long time ago and I was using Windows at that time.
Im using your guide as a baseline but noting down some mods for 6.5 vSphere. Would you install VCSA onto a third ESXi or on ESXi-01
Any ESXi host should be fine.